
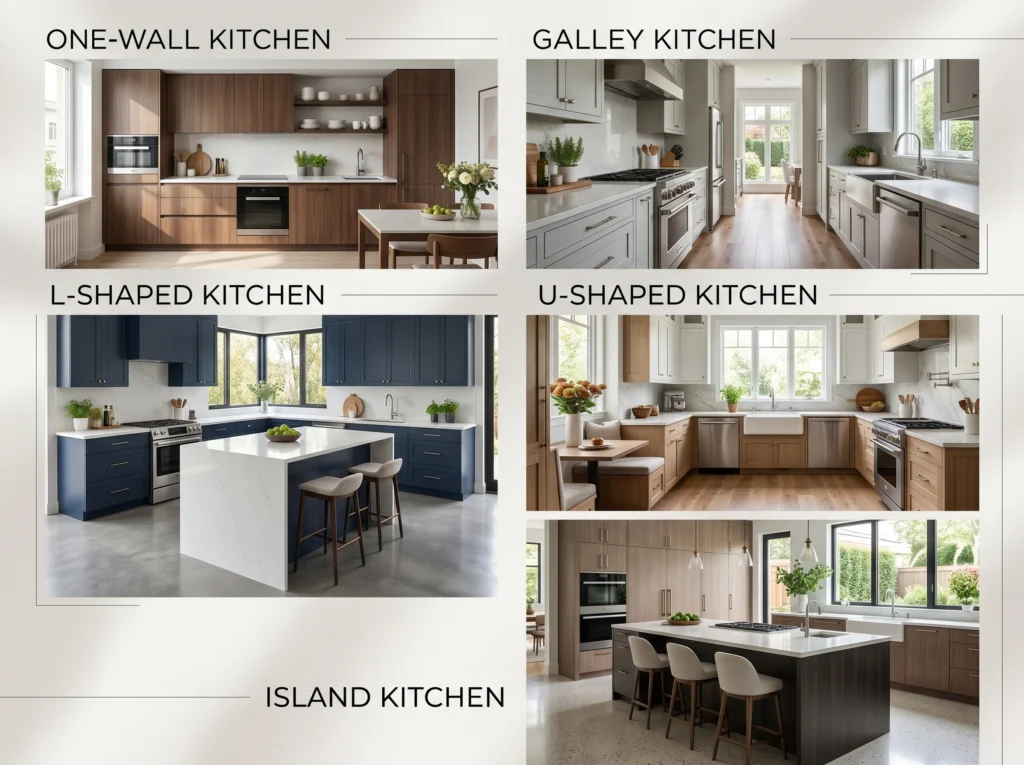
The kitchen layout is the most consequential design decision in any home. Every other choice — cabinet color, countertop material, appliance brand, lighting style — can be changed relatively easily over time. The layout, once built, is permanent in any practical sense. Getting it wrong means living with a kitchen that frustrates you every single day, no matter how beautiful it looks.
Most people approach kitchen design by thinking about what they want the kitchen to look like. Professional kitchen designers approach it the opposite way — they think first about how the kitchen will be used, who will be using it, and how many people will be in it at the same time. The appearance follows from those decisions. A kitchen that works beautifully for the way a family actually cooks and lives together will always feel better than one that looks impressive but creates constant workflow problems.
This guide covers the five most functional kitchen layouts used in residential design, explains how each one works, identifies the best situations for each, and gives you the practical information you need to decide which layout is right for your home. It also covers the foundational concept that underpins all good kitchen planning — the work triangle — and explains how to apply it regardless of which layout you choose.
Whether you are building a new kitchen from scratch, renovating an existing one, or simply trying to understand why your current kitchen does not work as well as it should, this guide gives you the knowledge to make the right decisions.
The Work Triangle: The Foundation of Every Good Kitchen Layout
Before examining individual layouts, it is essential to understand the work triangle — the principle that has guided kitchen design for decades and remains the most reliable framework for planning a functional kitchen.
The work triangle connects the three primary work stations in any kitchen: the refrigerator, the sink, and the cooking surface. These three points form a triangle, and the efficiency of a kitchen layout is largely determined by the size and shape of that triangle.
The principle behind the work triangle is straightforward. In any cooking process, the cook moves repeatedly between these three stations — from the refrigerator to retrieve ingredients, to the sink to wash and prepare them, and to the cooking surface to cook them. If any of these three stations is too far from the others, the cook wastes time and energy crossing unnecessary distances. If they are too close together, the workspace feels cramped and multiple people cannot work simultaneously.
The ideal work triangle has a total perimeter of between 12 and 26 feet, with no single leg of the triangle shorter than 4 feet or longer than 9 feet. Within these dimensions, movement between the three primary stations is efficient without being cramped.
The work triangle also establishes a clear principle for traffic flow. No major traffic path through the kitchen — a route people regularly walk to pass from one part of the house to another — should cut through the interior of the work triangle. When traffic passes through the cooking zone, it interrupts the cook’s workflow and creates safety hazards, particularly around hot surfaces and sharp implements.
Keep the work triangle concept in your mind as you read through each of the five layouts below. In each case, the goal is to create a triangle that falls within the ideal dimensions while keeping traffic outside the cooking zone.
Layout 1: The One-Wall Kitchen
What It Is
The one-wall kitchen places all cabinets, appliances, and countertops along a single wall. The refrigerator, sink, and cooking surface are all positioned in a single line, with countertop workspace between them. There are no cabinets or counters on any other wall.
How It Works
In a one-wall kitchen, the work triangle collapses into a work line — the cook moves along a single axis rather than between three points in space. This is a simpler workflow than a true triangle, but it functions well when the distance between the refrigerator and the cooking surface is kept reasonable.
The ideal total length for a one-wall kitchen is between 10 and 12 feet. Shorter than this and there is insufficient counter space between appliances to work comfortably. Longer than this and the distance between the refrigerator at one end and the cooking surface at the other becomes inconveniently large.
The recommended sequence along the wall, from left to right or right to left depending on your preference, is refrigerator, then countertop preparation space, then sink, then countertop preparation space, then cooking surface. This sequence mirrors the natural workflow of cooking — retrieve from refrigerator, prepare at counter, wash at sink, prepare further at counter, cook at stove.
Best Situations for a One-Wall Kitchen
The one-wall layout is the best choice for studio apartments and very small homes where only one wall is available for the kitchen. It is also the right choice for open-plan spaces where the kitchen is integrated into a larger living or dining area and a more expansive layout would visually dominate the room.
It works well for one person or a couple who cook relatively simple meals. For families who cook frequently and in larger quantities, the limited counter space of a one-wall layout creates genuine workflow constraints.
Advantages
The one-wall layout is the simplest and most affordable kitchen to install because all plumbing and electrical work runs to a single wall. It leaves maximum open floor space in the room, which is valuable in small apartments and open-plan spaces. It is also the easiest layout to clean and maintain because there are no corners or complex configurations.
Limitations and How to Address Them
The primary limitation of the one-wall kitchen is counter space. With a single run of countertop, there is a finite amount of preparation area, and this can feel restrictive when cooking complex meals or multiple dishes simultaneously.
The most effective solution is a kitchen island or a rolling cart positioned in front of the wall kitchen. An island adds a substantial preparation surface, creates a natural work triangle between the wall kitchen and the island, and provides additional storage underneath. It also creates a visual division between the kitchen zone and the living or dining zone in an open-plan space.
If the room is not wide enough for a permanent island — you need at least 42 inches of clearance between the island and the wall kitchen — a rolling cart serves the same function and can be moved out of the way when the space is needed for other purposes.
Layout 2: The Galley Kitchen
What It Is
The galley kitchen places cabinets and countertops on two parallel walls facing each other, with a corridor of floor space between them. The name comes from the narrow working kitchens found on ships and aircraft, where maximum efficiency in minimal space is the primary design goal.
How It Works
A galley kitchen creates two parallel work zones — one on each wall — with movement between them happening across the corridor. The work triangle in a galley kitchen is typically very efficient because the three primary stations are positioned on the two facing walls within a short distance of each other.
The ideal corridor width in a galley kitchen for a single cook is between 42 and 48 inches. This is wide enough to work comfortably and open appliance doors — including the oven, dishwasher, and refrigerator — without difficulty, while keeping the two work zones close enough together for efficient movement. For two cooks working simultaneously, a corridor of at least 48 inches is needed so that two people can pass each other comfortably.
The standard arrangement places the cooking surface and the refrigerator on one wall, with the sink on the opposite wall. This creates a natural work triangle across the corridor and keeps the sink separate from the cooking zone, allowing one person to wash up while another continues cooking.
Best Situations for a Galley Kitchen
The galley layout is the best choice for narrow rooms where the width is not sufficient for an L-shaped or U-shaped layout. It works exceptionally well in dedicated kitchen rooms that do not flow directly into a living or dining area, because the closed nature of the galley creates a focused cooking environment.
It is particularly well suited to serious home cooks who prioritize efficiency over socializing while cooking. The compact, focused nature of the galley layout puts everything within easy reach and minimizes the distance the cook needs to travel between stations.
Advantages
The galley kitchen delivers more storage and counter space than a one-wall kitchen in the same square footage because both walls are utilized. The workflow is highly efficient — everything is close together and accessible without crossing a large open floor area. It is also relatively affordable to install compared to more complex layouts.
Limitations and How to Address Them
The primary limitation of the galley kitchen is that it does not work well as a social space. The corridor configuration means that one cook occupies the working area while anyone else — a family member helping, a guest wanting to chat — is either in the corridor getting in the way or outside the kitchen entirely.
For families who like to cook together or who want the kitchen to feel connected to the social life of the home, a galley layout can feel isolating. In open-plan spaces, a galley kitchen that opens at both ends creates better flow than one that is closed at one end, allowing movement through the space.
The second limitation is that galley kitchens can feel dark, particularly in interior spaces without a window at one or both ends. Pale cabinet colors, reflective surfaces, and good artificial lighting are essential in a galley kitchen without natural light.
Layout 3: The L-Shaped Kitchen
What It Is
The L-shaped kitchen places cabinets and countertops along two adjacent walls that meet at a corner, forming the shape of the letter L. This is one of the most widely used kitchen layouts in residential design because it suits a broad range of room sizes and shapes and offers genuine flexibility in how the space is used.
How It Works
The L-shaped layout creates a natural work triangle in the corner zone, where the two walls meet. The sink is typically placed in or near the corner, with the cooking surface on one arm of the L and the refrigerator on the other. This distributes the three work stations effectively across the two walls while keeping the total perimeter of the triangle within the ideal range.
The corner itself — where the two walls of the L meet — is the most challenging area to use efficiently. Standard corner cabinets waste a significant amount of accessible storage space because the depth of the corner is difficult to reach. This is addressed through several specialized storage solutions covered in more detail below.
Best Situations for an L-Shaped Kitchen
The L-shaped layout works well in rooms that are roughly square or only slightly rectangular, where two adjacent walls are available for the kitchen without blocking major traffic routes. It suits open-plan spaces particularly well because the L shape naturally defines the kitchen zone while leaving the rest of the room open.
It is a good choice for families because it typically allows two people to work simultaneously — one at each arm of the L — without getting in each other’s way. It also accommodates a dining table or an island in the open floor space within or adjacent to the L, which makes it suitable for kitchens that serve a social function as well as a cooking one.
Advantages
The L-shaped kitchen offers a genuine work triangle, good counter space across two walls, and a natural separation between the cooking zone and the traffic flow through the room. It leaves a substantial area of open floor space that can accommodate an island, a dining table, or simply comfortable movement through the kitchen.
It scales well across room sizes — a small L-shaped kitchen in a compact apartment works with a shorter run of cabinets on each wall, while a large L-shaped kitchen in a family home can accommodate generous counter space and full-height cabinetry on both walls.
Corner Storage Solutions
The corner where the two walls of the L meet deserves specific attention because it is the area most commonly wasted in kitchen design. A standard corner cabinet with a single door and static shelves is the least efficient option — items at the back of the corner are almost inaccessible in daily use.
The most effective solutions for corner storage are lazy susan rotating shelves, which bring items at the back of the corner forward as the shelf rotates; pull-out corner drawers, which extend fully out of the cabinet for complete access; and magic corner systems, which use a linked shelf mechanism to bring rear items forward when the cabinet is opened. Any of these solutions transforms the corner from wasted space into genuinely useful storage.
Layout 4: The U-Shaped Kitchen
What It Is
The U-shaped kitchen places cabinets and countertops along three walls, forming the shape of the letter U. This layout maximizes the total amount of counter space and storage available in a kitchen and creates multiple distinct work zones within a single cohesive cooking environment.
How It Works
The U-shaped layout creates an enclosed cooking zone on three sides, with the open end of the U providing access to the rest of the room. The work triangle sits within the three walls of the U, with each of the primary stations — refrigerator, sink, and cooking surface — placed on a different wall. This keeps all three stations a short distance apart and creates an extremely efficient workflow for serious cooking.
The total counter space in a U-shaped kitchen is typically the greatest of any residential kitchen layout, making it well suited to kitchens that need to serve multiple cooks simultaneously or handle complex, multi-dish cooking sessions.
Best Situations for a U-Shaped Kitchen
The U-shaped layout requires more space than any of the previous layouts. The minimum room width for a functional U-shaped kitchen is 10 feet — this provides a corridor of at least 42 inches between the two parallel walls of the U, which is the minimum for comfortable working and appliance access.
It is the ideal choice for dedicated kitchen rooms in family homes where cooking is a central activity. It works best in rooms that are wider than they are long, because the U configuration uses three walls and needs adequate width to avoid making the interior of the U feel too narrow.
The U-shaped layout is less suited to open-plan spaces because the three-wall configuration creates an enclosed zone that feels separated from the rest of the room. In open-plan settings, the L-shaped layout or the island layout typically creates better visual and social integration.
Advantages
The U-shaped kitchen offers the greatest total amount of counter space and storage of any residential layout. It creates a highly efficient work triangle with short distances between all three primary stations. The enclosed nature of the cooking zone keeps traffic outside the working area naturally, without requiring deliberate planning.
It accommodates two or more cooks working simultaneously on different tasks without interfering with each other, making it the best layout for households where multiple family members cook together regularly.
Limitations and How to Address Them
The primary limitation of the U-shaped kitchen is the two corner junctions — there are two corners where adjacent walls meet, and both require the same corner storage solutions discussed in the L-shaped layout section. Without addressing these corners deliberately, a significant amount of the total cabinet volume is wasted.
The second limitation is that the enclosed nature of the U can feel isolating in the same way as a galley kitchen, particularly if the open end of the U does not provide a clear view into the rest of the living space. In open-plan settings, positioning the cooking surface on the wall that faces into the room — rather than against a back wall — allows the cook to face outward and maintain visual connection with family members or guests in the adjacent living area.
Layout 5: The Island Kitchen
What It Is
The island kitchen adds a freestanding or built-in counter unit — the island — to the center of the kitchen floor space. The island is separate from the perimeter cabinets and countertops and is accessible from all four sides. It can serve as additional preparation space, a secondary cooking or washing station, casual dining, or a combination of all three.
The island layout is not a standalone layout in the way the previous four are — it is almost always combined with one of the perimeter layouts, most commonly an L-shaped or U-shaped perimeter with an island in the center. A one-wall kitchen with an island in front is also a common and effective combination.
How It Works
An island changes the geometry of the kitchen fundamentally by adding a fourth point to the work triangle. This creates a more complex workflow with more possible routes between stations, which benefits multiple cooks working simultaneously but can create congestion if the clearances around the island are not sufficient.
The minimum clearance between the island and any perimeter counter or wall is 42 inches on working sides — the sides where the cook stands to work. On non-working sides, 36 inches is the minimum. These clearances allow comfortable working, appliance door opening, and movement past the island without collision.
Best Situations for an Island Kitchen
The island layout is best suited to large kitchens in open-plan homes. It requires enough floor space to accommodate both the island footprint and the required clearances on all sides without making the kitchen feel congested.
It is also well suited to households where cooking is a social activity — where family members and guests gather in the kitchen while cooking is happening. The island creates a natural gathering point that faces into the living or dining area, allowing the cook to interact with others without turning away from the work surface.
Island Features Worth Considering
An island can incorporate several functional features beyond a simple flat work surface. A second sink in the island creates a dedicated preparation sink separate from the main sink, which allows two people to work with water simultaneously. A cooking surface in the island — a hob positioned in the center of the island rather than at the perimeter — allows the cook to face into the room while cooking, which is the most social cooking configuration possible.
Seating at one end or one side of the island — bar stools at a raised counter section — creates a casual dining and socializing zone immediately adjacent to the cooking area. This is one of the most valued features in contemporary kitchen design because it integrates the kitchen fully into the social life of the home.
Storage underneath the island — drawers, cabinets, or open shelving — adds to the total storage volume of the kitchen and keeps the island surface from becoming a dumping ground for items with nowhere else to go.
Limitations and How to Address Them
The primary limitation of an island is the space it requires. Many kitchens that feel large enough for an island are not, once the required clearances are applied. A kitchen that is 10 feet wide with perimeter cabinets on two sides has approximately 7 feet of clear floor space between the counter faces — not enough for an island with adequate clearances on both working sides.
If your kitchen is not large enough for a permanent island, a rolling kitchen cart offers many of the same benefits in a flexible format. It provides additional preparation surface and storage, can be moved to create clearance when needed, and costs a fraction of a built-in island.
Choosing the Right Layout for Your Kitchen
With the five layouts explained, the decision process comes down to four questions asked in the right order.
The first question is what space do you have. Measure your kitchen room accurately and draw a floor plan. Mark the position of every door, window, and fixed feature. This immediately eliminates layouts that do not fit your room — a U-shaped kitchen in a room that is only 8 feet wide is not a viable option, regardless of how much you want one.
The second question is how do you cook and how many people cook at the same time. A single person who cooks simple meals does not need the same layout as a family of five where two adults regularly cook together. The more people who use the kitchen simultaneously and the more complex the cooking that happens in it, the more counter space and the more clearly defined work zones you need.
The third question is how does the kitchen relate to the rest of your home. A kitchen that opens directly into a living and dining area benefits from a layout that faces outward — an island layout, an L-shaped layout, or a one-wall layout — so that the cook remains visually connected to the rest of the space. A dedicated kitchen room that is separated from the living areas by a door can work with any layout, including the more enclosed galley and U-shaped options.
The fourth question is what is your budget. More complex layouts cost more to install because they involve more cabinetry, more countertop material, and more plumbing and electrical work. A galley or one-wall kitchen is significantly more affordable than a U-shaped or island kitchen of the same quality level. If budget is a constraint, choosing a simpler layout executed at a higher quality level is almost always a better result than a complex layout executed at a lower quality level.
Conclusion
A well-planned kitchen layout makes cooking easier, faster, and more enjoyable every single day. It keeps the workflow efficient, accommodates the number of people who actually use the kitchen, integrates appropriately with the rest of the home, and makes the most of the space available.
The five layouts covered in this guide — one-wall, galley, L-shaped, U-shaped, and island — cover the full range of residential kitchen configurations. Each one has a context in which it performs best, and choosing the right one for your specific room, household, and cooking habits is the most important kitchen design decision you will make.
Measure your space accurately, think honestly about how you cook and how many people will use the kitchen at the same time, apply the work triangle principle to whatever layout you choose, and make sure every clearance is adequate before finalizing any plan. Do these things in order, and the result will be a kitchen that works as well as it looks — and continues to work well for every year you live with it.
