
A small bathroom is one of the most challenging spaces to design well, and one of the most rewarding when it is done right. The challenges are real — limited floor space, often limited natural light, a fixed arrangement of plumbing that restricts how dramatically the layout can be changed, and a room that needs to serve multiple functional purposes within a very small footprint. But the rewards of getting it right are equally real. A small bathroom that has been thoughtfully designed feels calm, complete, and genuinely luxurious in a way that has nothing to do with its physical dimensions.
The most important thing to understand about making a small bathroom feel bigger is that the goal is not actually to make the room bigger. The room’s dimensions are fixed. The goal is to eliminate the visual and spatial cues that make the brain register the room as small, cramped, and limited — and to replace them with cues that signal openness, light, and space. This is entirely achievable through design decisions, and most of those decisions do not require structural changes, significant renovation, or large budgets.
Professional bathroom designers work with small spaces constantly, and they rely on a consistent set of principles that have been refined through experience and observation. These fifteen tricks represent the most reliably effective of those principles — the ones that produce the most significant improvement in how a small bathroom feels, applied in the most practical and accessible way possible. Some require renovation. Most do not. All of them work.
Trick 1: Choose Light Colors for Every Surface
Color is the most powerful tool available for making a small bathroom feel larger, and it costs relatively little to change. Light colors — soft whites, pale greys, warm creams, and muted sage greens — reflect natural and artificial light back into the space rather than absorbing it. This reflection creates the visual impression that the walls are further away than they actually are, which directly translates into a room that feels more open and spacious.
Dark colors do the opposite. They absorb light and draw surfaces inward visually, making the walls feel closer and the room feel more enclosed. This does not mean dark colors are always wrong in bathrooms — a deliberate dark palette executed with excellent lighting can be stunning — but in a bathroom where the primary goal is maximizing the sense of space, light colors are almost always the correct starting point.
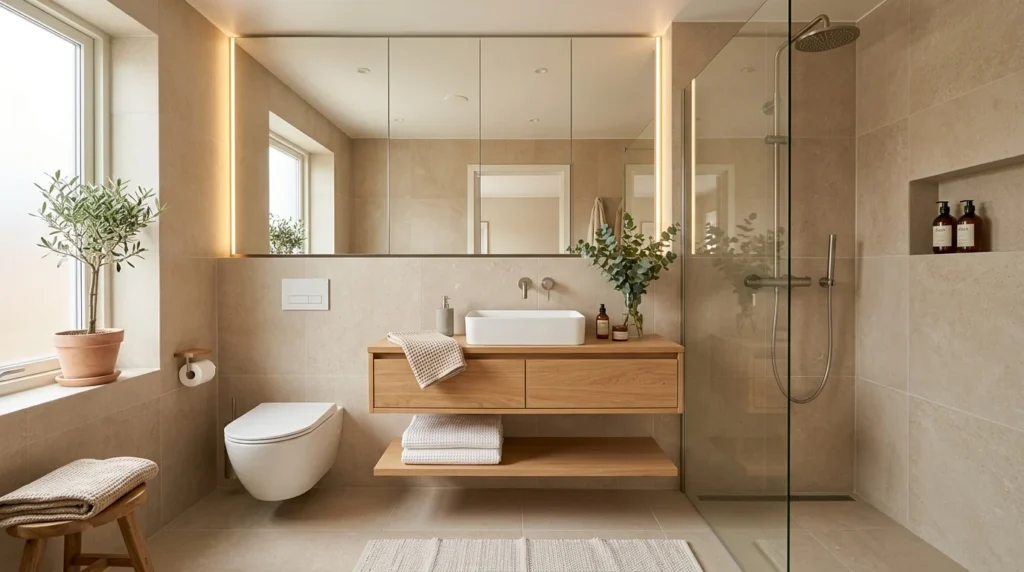
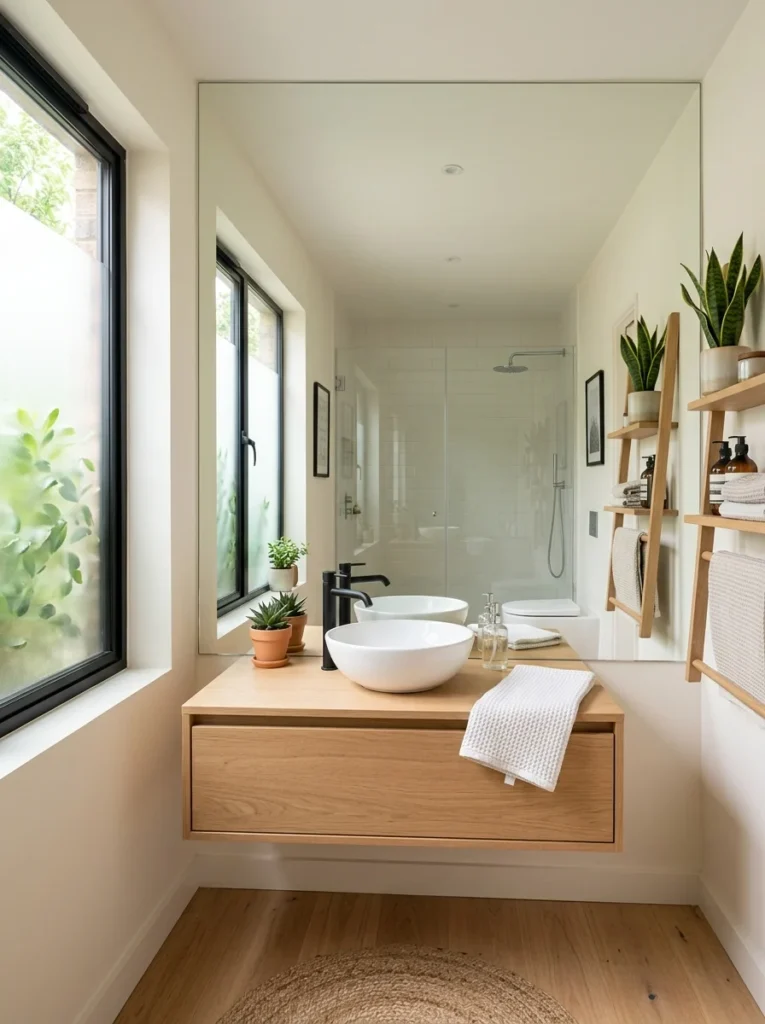
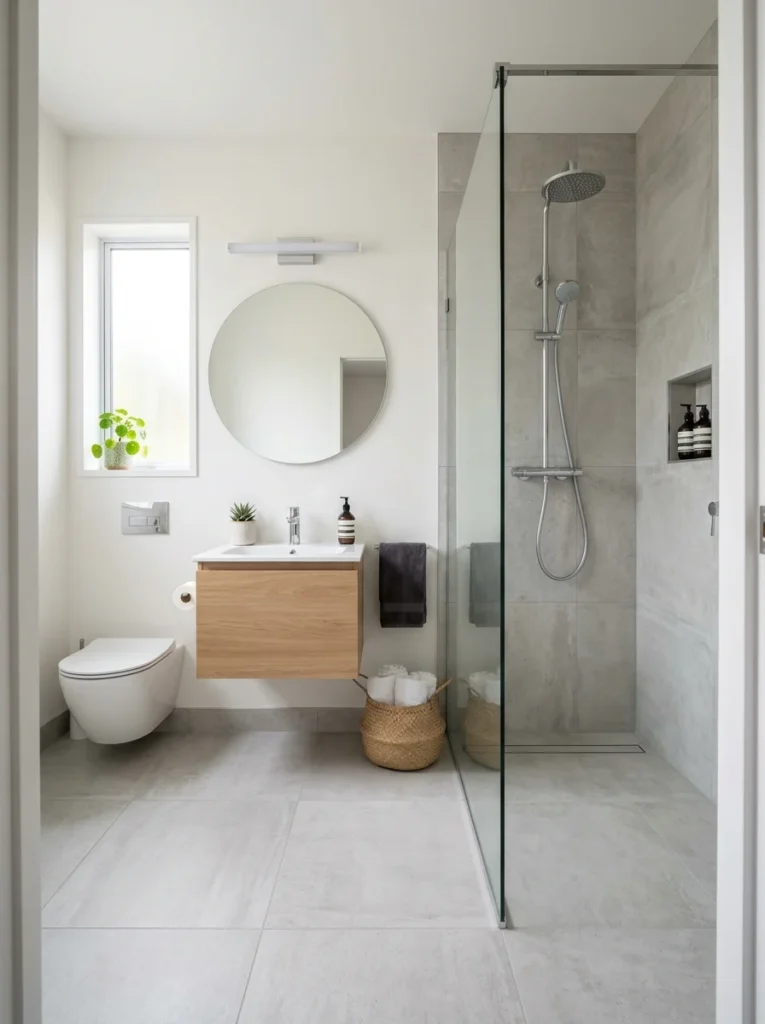
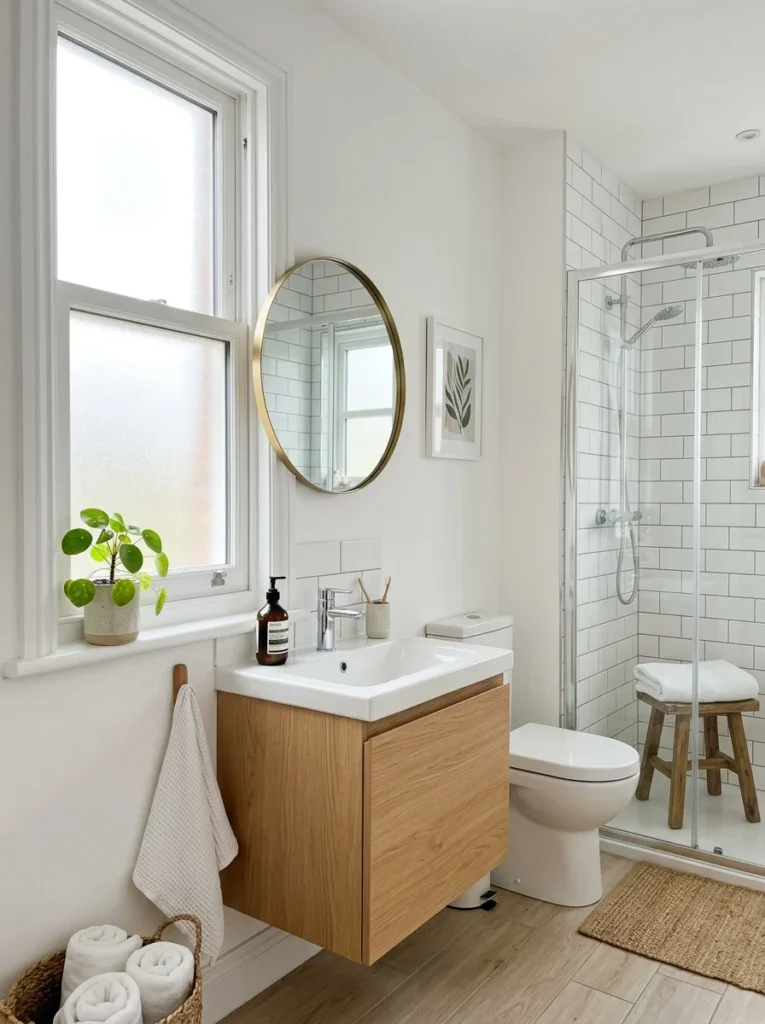
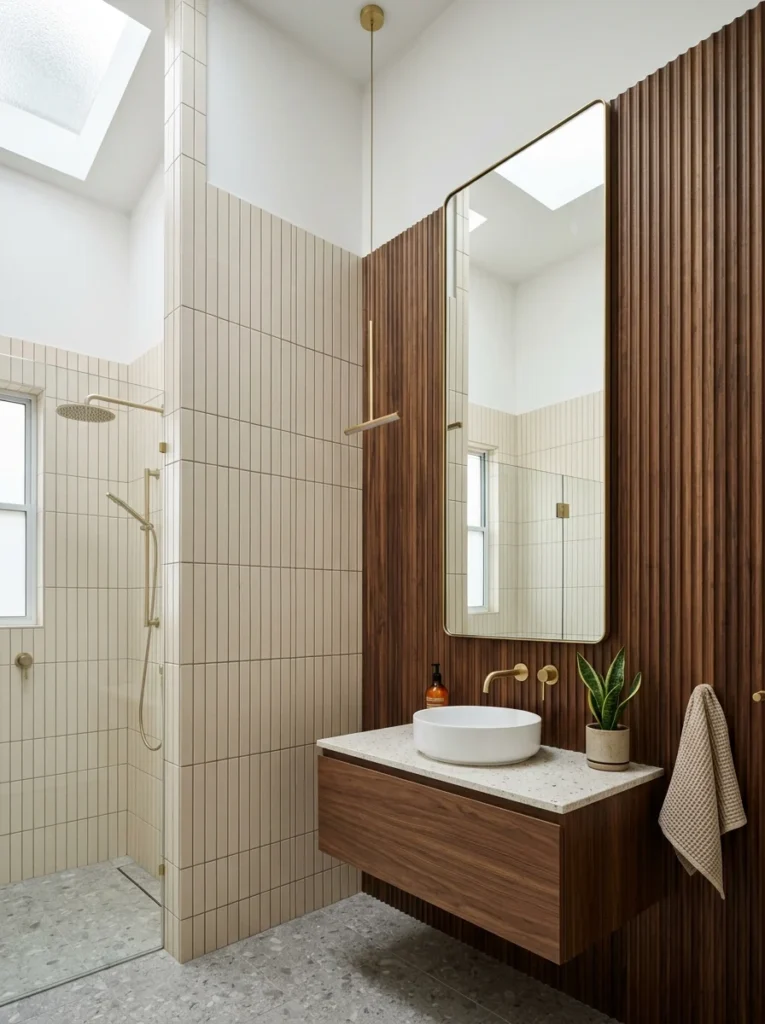
The most effective approach for a small bathroom is a monochromatic light palette — using the same light color or very similar tones across the walls, the tiles, and the fixtures. When all surfaces read in the same color family, the eye does not stop at the transition between wall and tile, between tile and floor, or between floor and fixture. The surfaces blend together visually, which creates a sense of seamless, continuous space that makes the room feel significantly larger than its actual dimensions.
Specific colors that consistently perform well in small bathrooms include warm white with yellow or cream undertones, soft ivory, pale sage green, and light warm grey. Avoid cool whites with blue undertones in small bathrooms with limited natural light — they can feel harsh and clinical rather than open and airy.
Trick 2: Use Large Format Tiles
Tile size has a profound effect on how large a bathroom feels, and the relationship is counterintuitive to many people. Smaller tiles — classic mosaic tiles, small subway tiles, penny tiles — create more grout lines per square foot of surface area. More grout lines mean more visual interruptions across the surface, which the eye reads as a busier, more complex pattern. A busier pattern makes a small room feel smaller because there is more visual information competing for attention in a limited space.
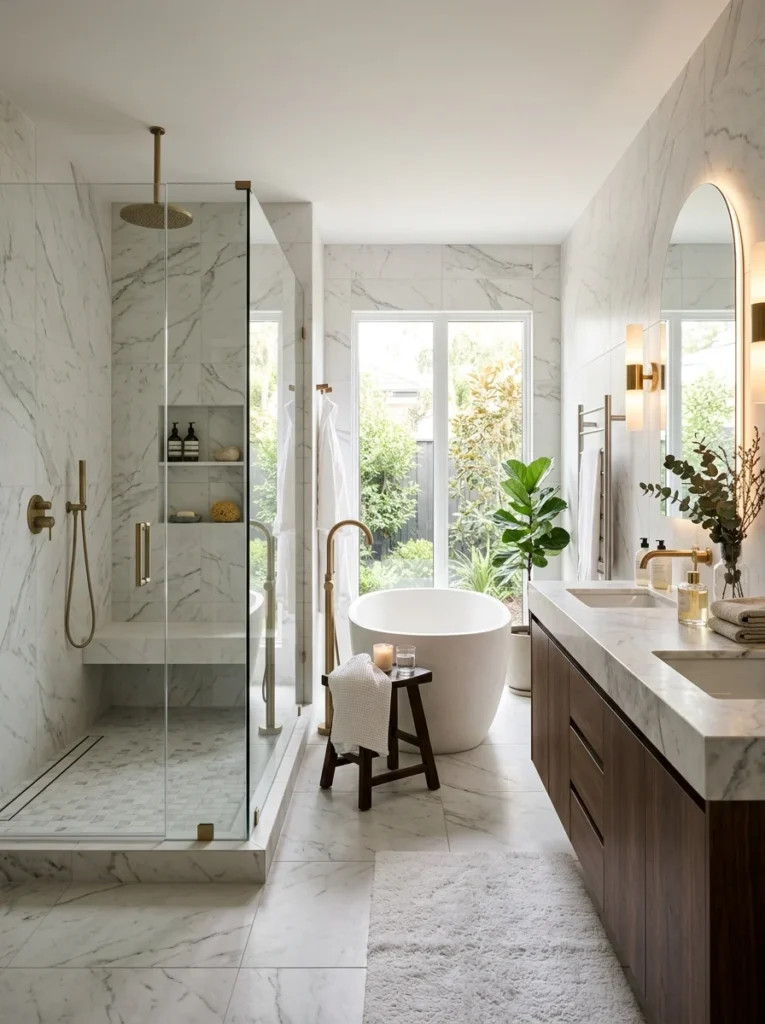
Large format tiles — tiles of 24 by 24 inches or larger on the floor, and tiles of 12 by 24 inches or larger on the walls — create fewer grout lines per square foot. The surfaces read as cleaner, simpler, and more continuous, which the eye interprets as more space. A bathroom tiled in large format tiles feels larger than an identical bathroom tiled in small mosaic tiles, even though the rooms are the same physical size.
The direction of tile laying matters alongside the size. Tiles laid in a horizontal brick pattern draw the eye sideways, which can make a narrow room feel slightly wider. Tiles laid in a vertical stack pattern draw the eye upward, which makes the ceiling feel higher. In a small bathroom with low ceilings, vertical tile laying is the more useful choice because height is typically the dimension that most needs to be emphasized.
Rectified tiles — tiles that have been precisely cut to exact dimensions with very fine grout joints — are the most effective option for maximizing the seamless, continuous surface effect of large format tiles. The near-invisible grout lines of rectified tiles allow the floor or wall to read as a single unbroken surface rather than individual tiles, which is the most powerful version of the large tile effect.
Trick 3: Take Tiles From Floor to Ceiling
In most bathrooms, tiles cover the shower area and a portion of the walls, with painted plasterboard above a certain height. This creates a horizontal line across the wall — the tile-to-paint transition — that the eye reads as a division of the wall surface. In a small bathroom, this horizontal division cuts the visual height of the room and makes it feel lower and more enclosed.
Taking tiles from the floor all the way to the ceiling eliminates this horizontal division and allows the eye to travel uninterrupted from floor to ceiling. The wall reads as a single continuous surface, the ceiling feels higher, and the room feels larger. This is one of the most effective single changes available in a bathroom renovation for improving the sense of space, and it requires no structural modification — only the decision to specify full-height tiling from the outset.
The same principle applies to the shower enclosure. A shower with tiling that stops at standard head height and transitions to paint or a different material above it feels lower and more confined than one where the tile continues to the ceiling. Full-height shower tiling is both more visually generous and more practical — there is no paint above the shower zone to deteriorate from steam and moisture.
Trick 4: Install a Large Mirror or a Full Mirror Wall
Mirrors are the oldest and most reliable spatial expansion tool in interior design, and they work in bathrooms more effectively than in almost any other room because bathroom layouts naturally provide the wall space opposite or adjacent to windows where mirror placement is most effective.
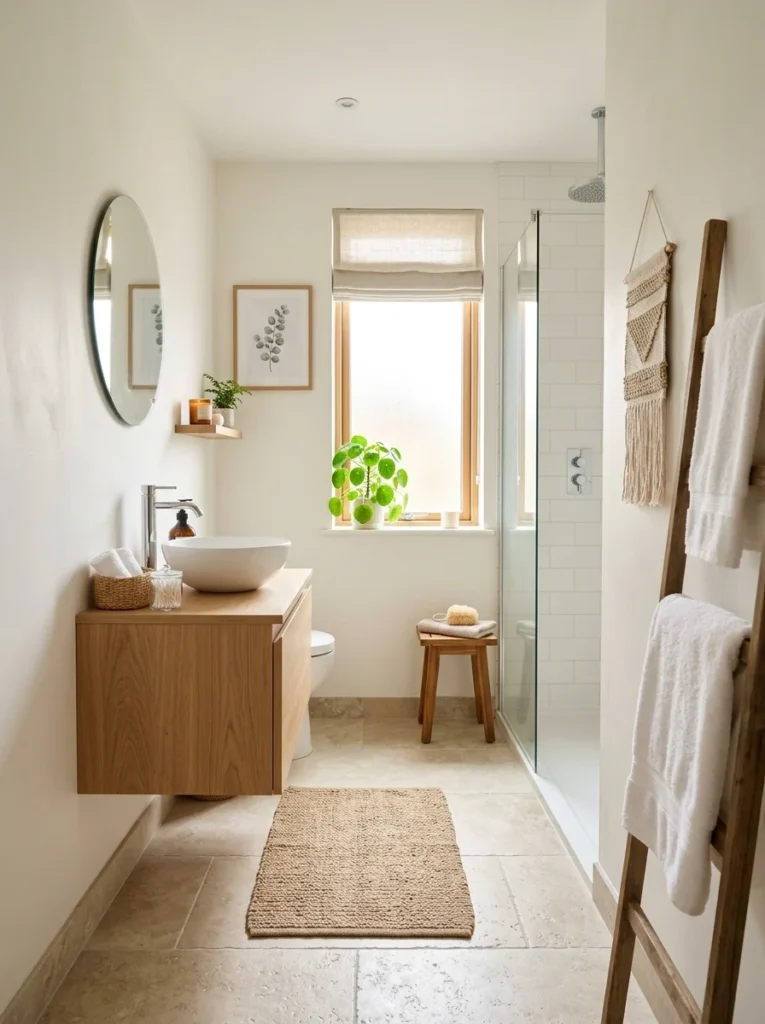
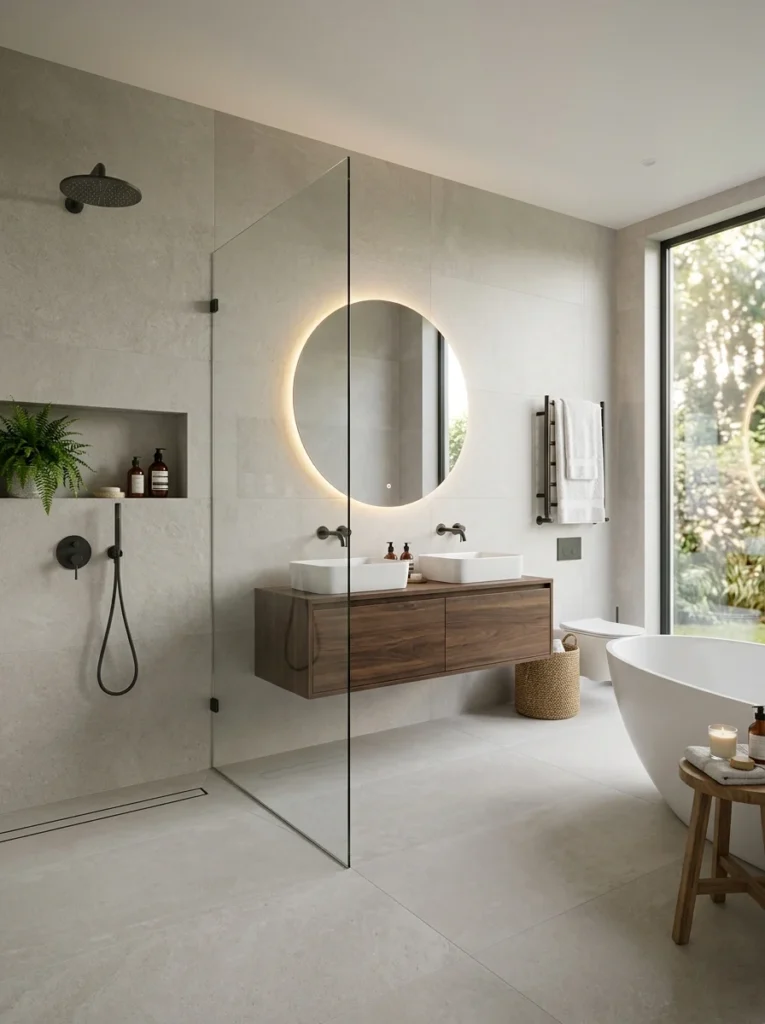
The key principle is that the mirror needs to be large enough to make a genuine spatial impact. A small decorative mirror above the vanity adds a reflective surface but does not create the sense of expanded space that a large mirror produces. A mirror that spans the full width of the vanity, or one that covers the majority of the wall above the basin, creates a reflection of the room that appears to double its depth — the reflected image suggests that the room continues beyond the wall, which the eye partially accepts as real space.
A full mirror wall — a single mirror covering the entire wall from vanity height to ceiling, or from side wall to side wall — is the most dramatic version of this trick and produces the most significant spatial expansion effect. In a very small bathroom, a full mirror wall above the vanity can make the room feel almost twice as large as its actual dimensions. The reflection captures the light from the window, the light from the fixtures, and the depth of the room beyond the mirror wall, all of which contribute to the expanded spatial impression.
Backlit mirrors — mirrors with LED lighting integrated behind or around the perimeter — serve the double function of expanding the space visually through reflection and providing excellent task lighting for grooming. The soft glow of a backlit mirror adds warmth and depth to the bathroom that standard overhead lighting cannot achieve, and the lighting quality is significantly better for the activities that take place at a bathroom mirror.
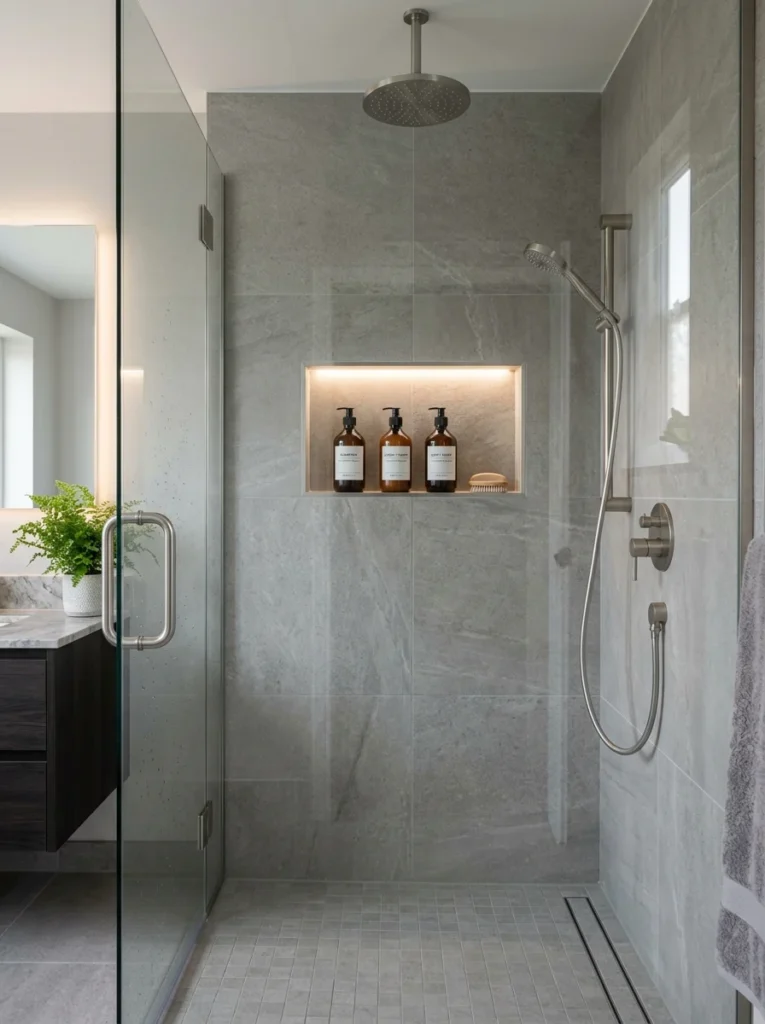
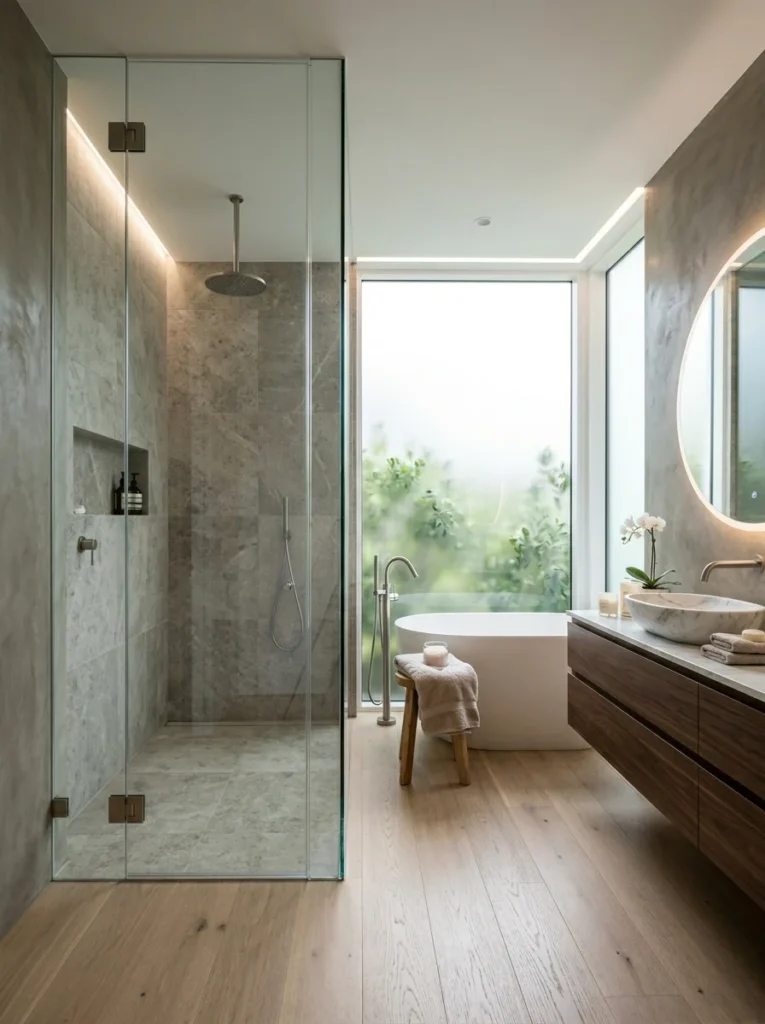
Trick 5: Replace the Shower Curtain With a Glass Screen
A shower curtain, when drawn, divides the bathroom into two visually separate zones — the shower zone behind the curtain and the bathroom zone in front of it. In a small bathroom, this division is particularly damaging because it cuts the already limited floor space into two smaller sections, each of which feels more cramped than the combined space would.
A clear glass shower screen eliminates this visual division completely. The eye travels through the glass into the shower area, which reads as part of the bathroom space rather than a separate enclosed zone. The entire floor area of the bathroom is visible simultaneously, which makes the room feel significantly larger than when the shower curtain is drawn across it.
The choice between a framed and a frameless glass screen matters for the spatial effect. A framed glass screen has metal framing around its perimeter that creates visible lines against the glass surface. These lines are minor interruptions in the visual field but they do slightly reduce the seamless quality of the glass. A frameless glass screen has no perimeter framing — the glass is secured with minimal hardware at the top and sides, and the screen reads as a continuous transparent surface with no interruption. The frameless screen produces the strongest spatial expansion effect and also looks significantly more luxurious.
If a full glass enclosure is not within the budget or the renovation scope, even a simple fixed glass panel — a single pane of glass that shields the shower head end of the shower without a curtain — creates a partial version of the open effect that improves on the curtain considerably.
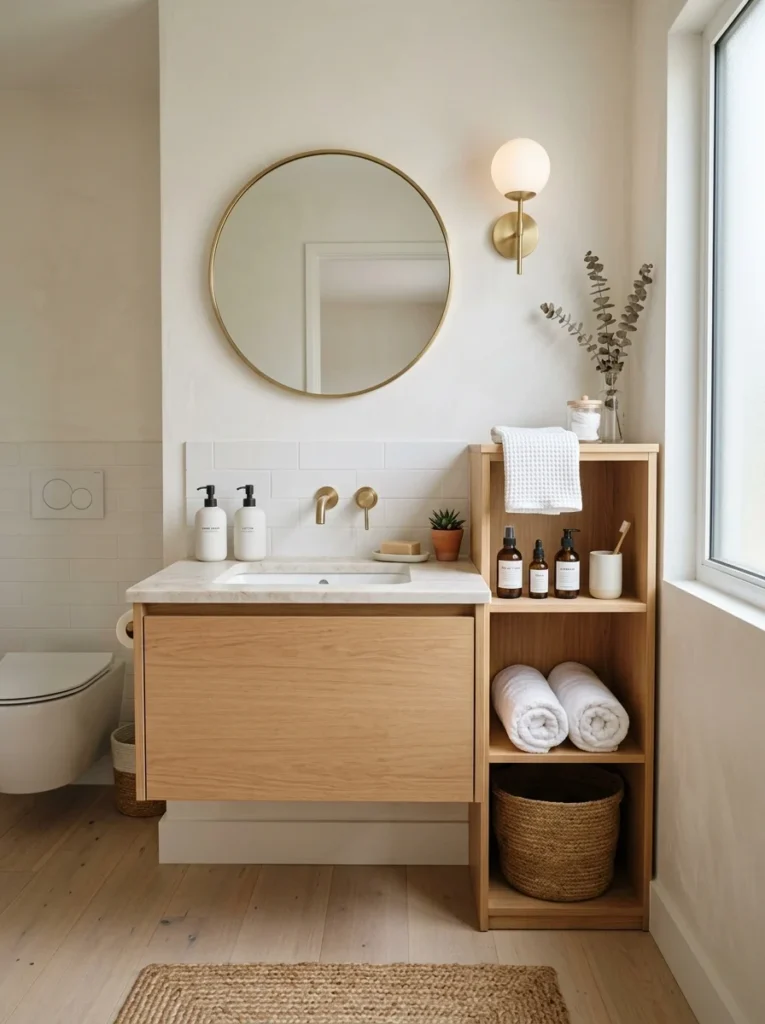
Trick 6: Install a Floating Vanity

A vanity that sits on the floor — with a cabinet base that extends from the countertop to the floor — blocks the view of the floor beneath it. In a small bathroom, the floor is a significant portion of the total visible surface area, and anything that blocks the view of the floor reduces the perceived floor area and makes the room feel more cramped.
A floating vanity — one that is wall-mounted with the cabinet suspended above the floor rather than resting on it — leaves the floor visible beneath the vanity. This visible floor area is genuinely small — perhaps six to twelve inches of floor between the bottom of the cabinet and the floor surface — but the visual effect is disproportionate to the actual space. The eye reads the continuous, uninterrupted floor surface as larger than the interrupted one, which translates into a bathroom that feels more open and spacious.
The practical benefit of a floating vanity is that the floor beneath it is accessible for cleaning, which makes maintaining a clean floor easier than with a floor-mounted vanity where dust and debris accumulate in the inaccessible base.
The floating vanity also creates an opportunity for recessed LED strip lighting underneath the cabinet — a design detail that adds a warm glow at floor level, makes the vanity appear to hover above the floor, and contributes a spa-like quality to the bathroom atmosphere that is disproportionate to its modest cost.
The height of a floating vanity is a consideration that affects both comfort and spatial impact. A vanity installed slightly higher than standard — 34 to 36 inches rather than the standard 32 inches — provides a more comfortable working height for most adults and allows more floor to be visible beneath it, which maximizes the spatial expansion effect.
Trick 7: Maximize Natural Light at Every Opportunity
Natural light is the most powerful ally in making any small space feel larger, and in a bathroom — where the window is often small, frosted, or positioned awkwardly — maximizing every available source of natural light requires deliberate effort.
The first consideration is the window treatment. A frosted or obscure glass window provides the privacy a bathroom requires while allowing natural light to pass through. Many bathrooms have curtains or blinds on windows that further reduce the already limited light entering the room. In most bathroom situations, the obscure glass of the window provides sufficient privacy without any additional window treatment, and removing the curtain or blind allows the full amount of natural light available to enter the room unimpeded.
If the window has clear glass and privacy is a genuine concern, frosted window film applied to the glass surface provides privacy equivalent to frosted glass while preserving the full light transmission of a clear pane. This is a simple and inexpensive modification that can transform a bathroom that previously required a privacy curtain into one that receives full natural light without compromise.
The second consideration is what the natural light falls on when it enters the room. Light-colored, reflective surfaces — pale tiles, a large mirror, a white ceiling, glossy finishes — reflect incoming natural light throughout the room and amplify its effect. Dark or matte surfaces absorb the incoming light rather than reflecting it. In a small bathroom with limited natural light, using light and reflective surfaces throughout ensures that every photon of available natural light does maximum work in making the room feel bright and open.
Trick 8: Use Recessed Lighting Instead of Surface-Mounted Fixtures
The ceiling of a small bathroom is one of the room’s most significant visual elements — it is the surface that defines the upper boundary of the space, and anything that hangs below it reduces the perceived height of the room.
Surface-mounted ceiling light fixtures — pendant lights, flush-mount fixtures, and traditional ceiling roses with pendant shades — all hang below the ceiling surface to some degree. In a bathroom with low or standard ceiling height, even a modest fixture that drops three or four inches below the ceiling creates a visual impression of lower ceiling height. In a small bathroom where every inch of perceived height matters, this reduction is significant.
Recessed ceiling lights — lights that are installed flush with the ceiling surface so that only the trim ring is visible — eliminate this problem. The ceiling remains uninterrupted, the perceived height of the room is maximized, and the light source itself is invisible from most viewing angles. The result is a bathroom that feels taller, cleaner, and more considered than one with surface-mounted fixtures.
The positioning of recessed lights matters alongside the decision to use them. A single recessed light in the center of the ceiling provides functional illumination but does not create the depth and warmth that multiple light sources produce. Three or four recessed lights distributed across the ceiling provide more even coverage and eliminate the shadows that a single central source creates in the corners of the room. Adding a dedicated recessed light above the shower — in a waterproof fitting rated for wet areas — ensures the shower is properly illuminated rather than relying on spill light from the main ceiling fixtures.
Trick 9: Choose a Wall-Hung Toilet
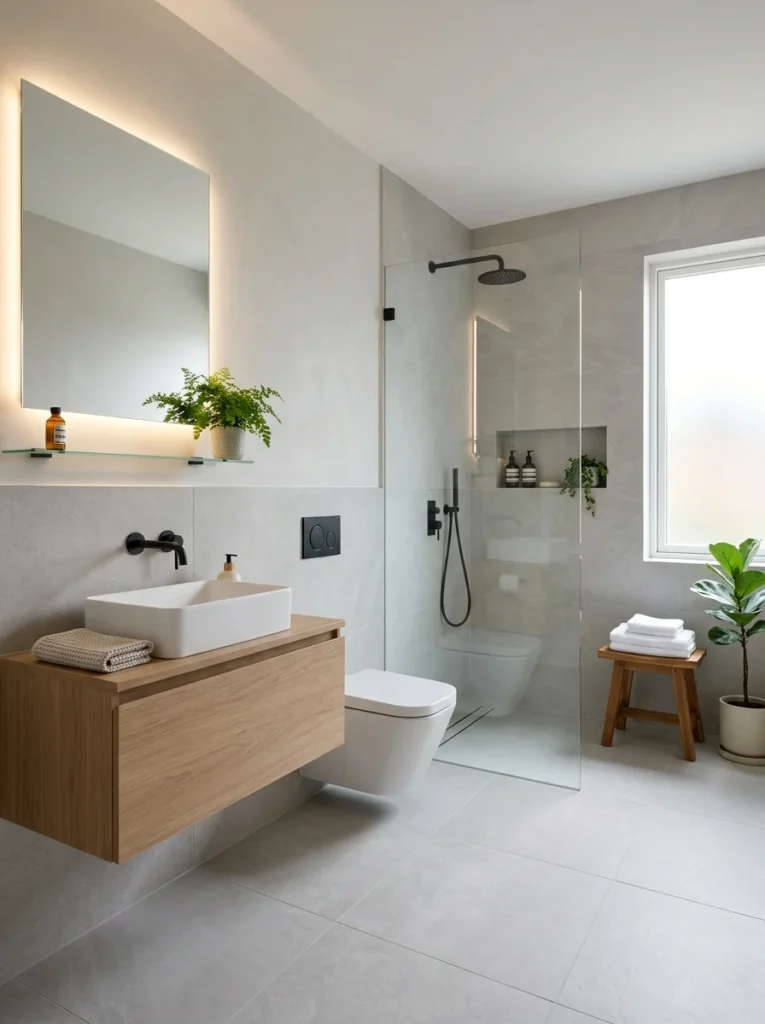
The same principle that makes a floating vanity effective in expanding the perceived space of a small bathroom applies equally to the toilet. A standard floor-mounted toilet has a visible base that sits on the floor and makes the toilet appear to occupy more floor area than it actually does. The cistern at the back of the toilet adds additional bulk at a height that interrupts the clean, continuous line of the walls.
A wall-hung toilet has the bowl suspended from the wall with no visible floor contact. The cistern is concealed within the wall cavity behind a flush panel, which removes the cistern from the visible room entirely. The floor beneath and around the toilet is completely clear — visible and accessible — which creates the same spatial expansion effect as the floating vanity at the opposite end of the bathroom.
The practical benefit of a wall-hung toilet beyond the spatial effect is that the floor beneath and around it is easy to clean thoroughly. There is no inaccessible space behind the cistern, no base seal around the floor mount, and no hidden area beneath the bowl where cleaning is difficult. The bathroom floor remains genuinely clean rather than clean-looking from a distance.
Wall-hung toilets require a carrier frame installed within the wall cavity — a steel frame that supports the weight of the toilet and the user — which adds to the installation cost compared to a floor-mounted toilet. In a bathroom renovation where the walls are being opened anyway, this additional cost is modest. In a bathroom where walls are not being touched, the carrier frame installation requires opening a section of wall that adds more significantly to the project cost.
Trick 10: Use Vertical Lines to Draw the Eye Upward
Vertical lines — design elements that run from floor level toward the ceiling — direct the eye upward along their length, which creates the visual impression of increased height. In a small bathroom where the ceiling feels low or the room feels compressed, introducing deliberate vertical lines is one of the most effective ways to open up the perceived space.
The most common and most effective source of vertical lines in a bathroom is tile laying direction. The same tile laid in a vertical stack pattern — with each tile aligned directly above the one below it, creating continuous vertical grout lines — reads as taller and more spacious than the same tile laid in a horizontal brick pattern. Changing only the tile laying direction, with no other modification, can meaningfully alter the perceived proportions of a bathroom.
Tall, narrow mirrors reinforce vertical emphasis at the vanity wall. A mirror that is taller than it is wide draws the eye upward and makes the wall feel higher than one that is wider than it is tall. A vertical shiplap or fluted tile accent wall — with its characteristic vertical ribbing — creates strong vertical direction that lifts the eye toward the ceiling and makes the wall feel significantly taller.
Tall, slender storage towers beside the toilet or beside the vanity also contribute vertical emphasis while serving the practical function of providing storage in a space-efficient footprint.
Trick 11: Eliminate Visual Clutter on Every Surface
Clutter in a small bathroom has a more damaging effect on the perception of space than clutter in any other room. Every item sitting on the vanity surface, every product lined up around the bath or shower, every object on the windowsill, and every item hanging from hooks on the back of the door adds visual information that the brain processes as evidence of a cramped, overloaded space.
The most effective approach to bathroom surface management is to treat every visible surface as though it will be photographed. The vanity surface should hold only the items used every single day — a soap dispenser, a toothbrush holder, and perhaps a single small plant. Every other product should be stored in a drawer, in a cabinet, or in the shower when it is needed. The shower should hold only the products currently in use — not an accumulating collection of half-finished bottles at various stages of depletion.
Matching dispensers — a matched set of soap, shampoo, and conditioner dispensers in a single material and color — create a more cohesive and less visually busy shower shelf than a collection of mismatched commercial bottles in varying colors, sizes, and label designs. Decanting bathroom products into matching dispensers is an inexpensive change that dramatically improves the visual coherence of the shower zone and the bathroom as a whole.
Trick 12: Install Recessed Shelving in the Shower Niche
Storage in a small bathroom is a persistent challenge because every storage solution that protrudes into the room — a freestanding shelf unit, a shower caddy hanging from the shower head, a towel rack extending from the wall — reduces the available floor or wall space and adds visual bulk to an already limited room.
A recessed shower niche — a shelf built into the wall of the shower by cutting between studs and tiling the interior — provides generous shower storage with zero protrusion into the shower space. The niche sits flush with the wall surface, takes up no shower floor space, and when tiled in the same material as the surrounding walls, becomes a neat and integrated storage feature rather than an added element.
The same principle applies to recessed medicine cabinets above the vanity. A recessed medicine cabinet sits within the wall rather than protruding from it, providing enclosed storage for bathroom products without adding depth to the room at the vanity wall. A large recessed medicine cabinet can replace both a mirror and a vanity cabinet in a small bathroom, performing both functions simultaneously with the spatial footprint of neither.
Trick 13: Use Over-Toilet Storage for the Most Underused Space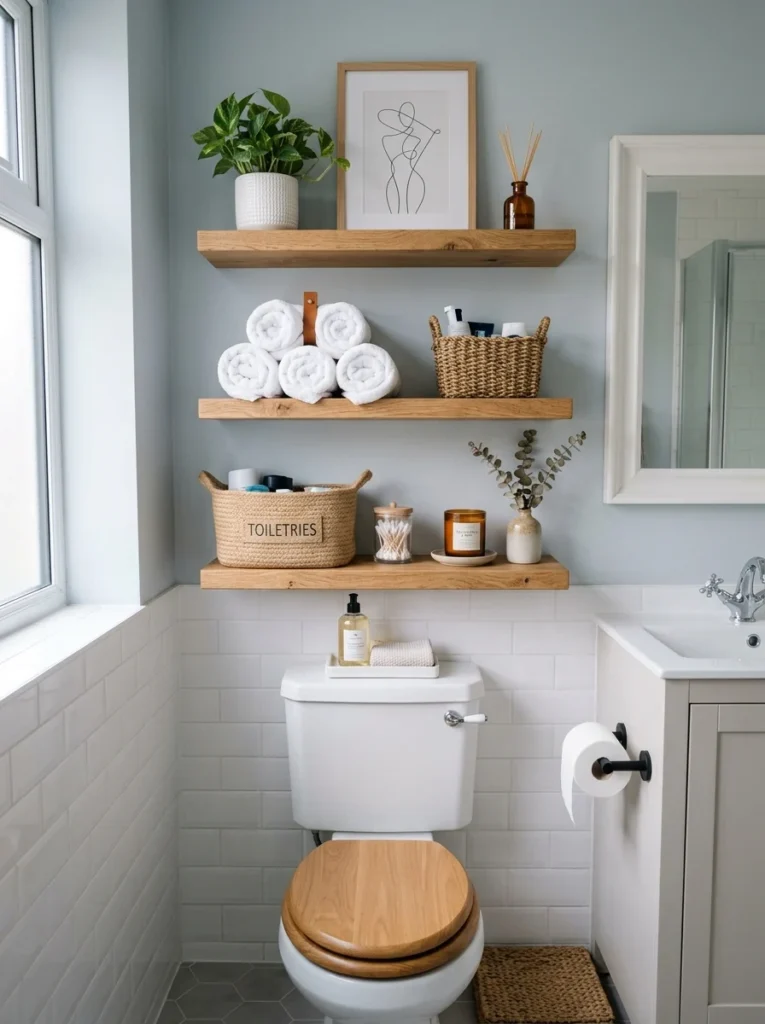
The wall space above the toilet is the most consistently underused storage area in most bathrooms. It is typically left bare, which wastes a surface that could provide substantial storage without consuming any floor space.
A wall-mounted cabinet or shelving unit above the toilet — installed high enough that it does not interfere with using the toilet comfortably, typically at least eight to ten inches above the cistern — provides storage for towels, toiletries, spare supplies, and decorative objects in a location that was previously contributing nothing to the room’s function.
The storage above the toilet is best used for items that are not needed daily — spare toilet paper, spare toiletry supplies, clean towels folded neatly, and perhaps a plant or a candle that adds a decorative note at eye level. Daily-use items are better stored closer to the vanity where they are needed, keeping the above-toilet area for the overflow storage that would otherwise require floor space the bathroom cannot afford to give.
Trick 14: Choose the Right Shower Screen Height
In bathrooms where a glass shower screen is already installed or planned, the height of the screen is a detail that significantly affects how the bathroom feels. A shower screen that stops at standard height — typically around 72 to 78 inches — leaves a gap between the top of the screen and the ceiling. This gap creates a horizontal line across the bathroom that divides the upper portion of the room visually and makes the ceiling feel lower.
A shower screen that extends to the full ceiling height eliminates this gap and allows the eye to travel from the shower floor to the ceiling without any horizontal interruption. The room feels taller, the shower enclosure feels more substantial, and the overall impression is of a bathroom that has been designed with deliberate attention to how each element relates to the whole.
Full-height glass shower screens cost more than standard-height ones because they require more glass and more precise installation, but the spatial improvement they produce in a small bathroom makes them worth the additional investment in most renovation situations.
Trick 15: Keep the Floor Pattern Simple and the Grout Light

The floor of a small bathroom is one of the most visible surfaces in the room because it is seen from the moment the door is opened. The tile pattern and the grout color on the floor have a significant effect on how large the space appears.
Complex floor tile patterns — intricate mosaics, bold geometric designs, multi-color arrangements — add visual interest at floor level but also add visual complexity that the eye works harder to process. In a small bathroom, this additional visual work reinforces the sense of limitation and busyness that makes the room feel smaller.
A simple floor tile in a large format with a light, matching grout creates the cleanest and most spacious floor effect available. The light grout keeps the tile joints visually quiet, allowing the eye to read the floor as a continuous surface rather than a grid of individual tiles. Dark grout on light tiles creates a graphic grid pattern that adds visual complexity and reinforces every tile boundary — the opposite of the seamless effect that makes a small bathroom feel larger.
If visual interest is desired at floor level, a simple geometric tile in two tones — white and warm grey, cream and pale beige — adds pattern without the complexity of a multi-color design, and a light grout keeps the pattern quieter than dark grout would.
Bringing All Fifteen Tricks Together
The most significant transformations in small bathrooms come from applying several of these tricks simultaneously rather than implementing any single one in isolation. Light colors, large tiles, a floating vanity, a glass shower screen, and good lighting together create a cumulative spatial expansion effect that is dramatically greater than any individual element could achieve alone.
Not every trick is appropriate for every bathroom or every budget. Some — changing the tile size, installing a floating vanity, replacing the toilet — require renovation. Others — removing unnecessary window treatments, decluttering surfaces, adding a large mirror, replacing a shower curtain with a glass screen — require minimal investment and can be done without any structural work.
The most practical approach is to identify which tricks are immediately applicable without renovation and implement those first. Then, when renovation becomes possible, prioritize the structural changes — floating vanity, recessed lighting, large format tiles, wall-hung toilet — that deliver the most significant and most permanent spatial improvement.
A small bathroom designed with these principles in mind is not a compromise or a limitation — it is a room that demonstrates that thoughtful design consistently outperforms square footage in determining how a space actually feels to use.
Conclusion
Making a small bathroom feel bigger is ultimately about understanding how the brain perceives space and making deliberate design decisions that work with that perception rather than against it. Light colors that reflect rather than absorb, large tiles that reduce visual complexity, mirrors that suggest depth beyond the wall surface, glass that keeps the eye moving through the space, floating fixtures that reveal the floor beneath them, vertical lines that lift the eye toward the ceiling — each of these tricks addresses a specific aspect of how the brain reads a room, and together they produce a bathroom that feels genuinely spacious rather than merely adequate.
The fifteen tricks in this guide are not theoretical — they are the practical tools that professional bathroom designers use in every small bathroom project because they work reliably, consistently, and across a wide range of budget levels and renovation scopes. Apply as many of them as your situation allows, starting with the ones that require the least investment and building toward the structural changes that deliver the most permanent improvement.
The result will be a bathroom that feels larger than it measures — which is precisely the goal.