
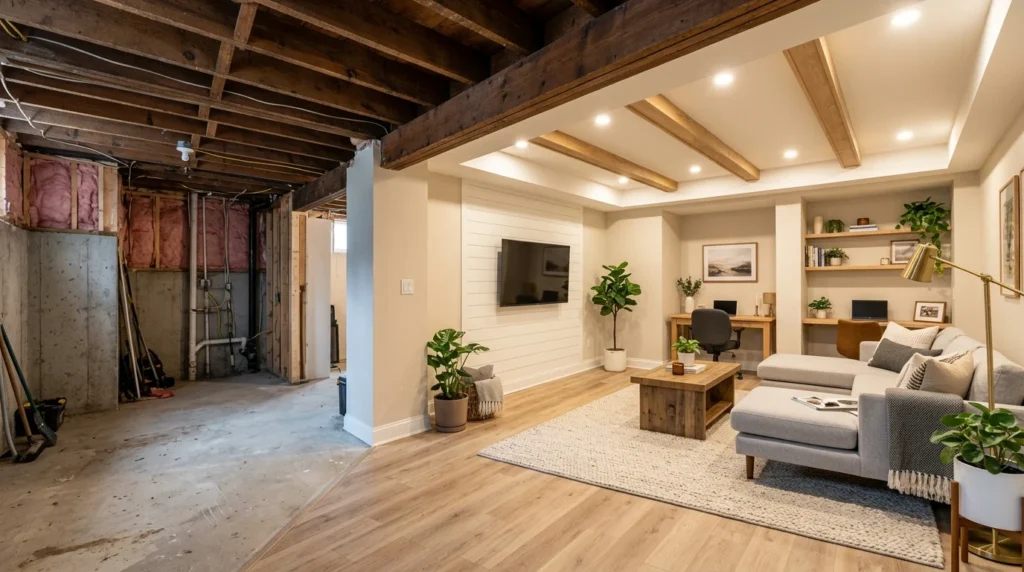
An unfinished basement is one of the most significant untapped resources in any home. While the rest of the house is fully occupied and every room serves a defined purpose, the basement sits below — a raw, utilitarian space of concrete floors, exposed joists, bare walls, and visible pipes and wiring that contributes nothing to the daily life of the household beyond the mechanical functions it houses. The water heater is down there. The electrical panel is down there. The washing machine and dryer may be down there. And beneath all of that utility, there is typically a substantial amount of floor space that could serve as a family room, a home office, a guest bedroom, a children’s playroom, a home gym, or any number of other uses that the rest of the house cannot provide.
Converting an unfinished basement into a livable space is one of the highest-value home improvement projects available in terms of the ratio of added living area to investment cost. Adding a new room through conventional construction — an addition to the house’s existing footprint — costs significantly more per square foot than finishing an existing basement space, because the basement’s structural elements — foundation walls, floor slab, and ceiling joists — are already in place. The finishing project adds the elements needed to make the space habitable — insulation, interior wall surfaces, flooring, lighting, heating, and the appropriate finishing details — without the structural construction costs of a conventional addition.
The challenge of finishing a basement, particularly for someone approaching the project for the first time, is the number of variables that need to be assessed, understood, and addressed before any finishing work begins. Unlike painting a room or replacing flooring on an upper level, finishing a basement involves decisions and assessments that have safety and building code implications — moisture management, structural considerations, egress requirements, and mechanical system integration — that need to be handled correctly from the outset to produce a finished space that is safe, comfortable, and durable.
This guide takes the basement finishing process from the very beginning — the assessment of the existing space before any work begins — through each stage of the conversion: moisture management, ceiling options, insulation and framing, flooring selection, lighting, and the primary use options for the finished space. It is written for the homeowner who is approaching basement finishing for the first time, with the goal of giving them the knowledge to make informed decisions at each stage, to work productively with the contractors they hire for the technical elements they cannot do themselves, and to avoid the most common and most costly basement finishing mistakes.
Section 1: Assess Before You Plan — The Non-Negotiable First Step
The most important principle in basement finishing is that assessment must precede planning. A basement finishing plan developed without a thorough assessment of the existing space — its moisture conditions, its ceiling height, its structural configuration, and its mechanical systems — is a plan built on assumptions that may prove incorrect. The cost of discovering that the basement has a persistent moisture problem after the walls are framed and insulated, or that the ceiling height is insufficient for comfortable habitation in the primary use zone, is far greater than the cost of spending adequate time on assessment before the first plan is drawn.
Moisture Assessment — The Most Critical Evaluation
Moisture is the primary challenge in basement finishing and the primary reason that basement finishing projects fail — not immediately, but over months and years as moisture that was not addressed before finishing gradually degrades insulation, warps framing, promotes mold growth, and compromises the finished surfaces that were installed over an unresolved moisture problem.
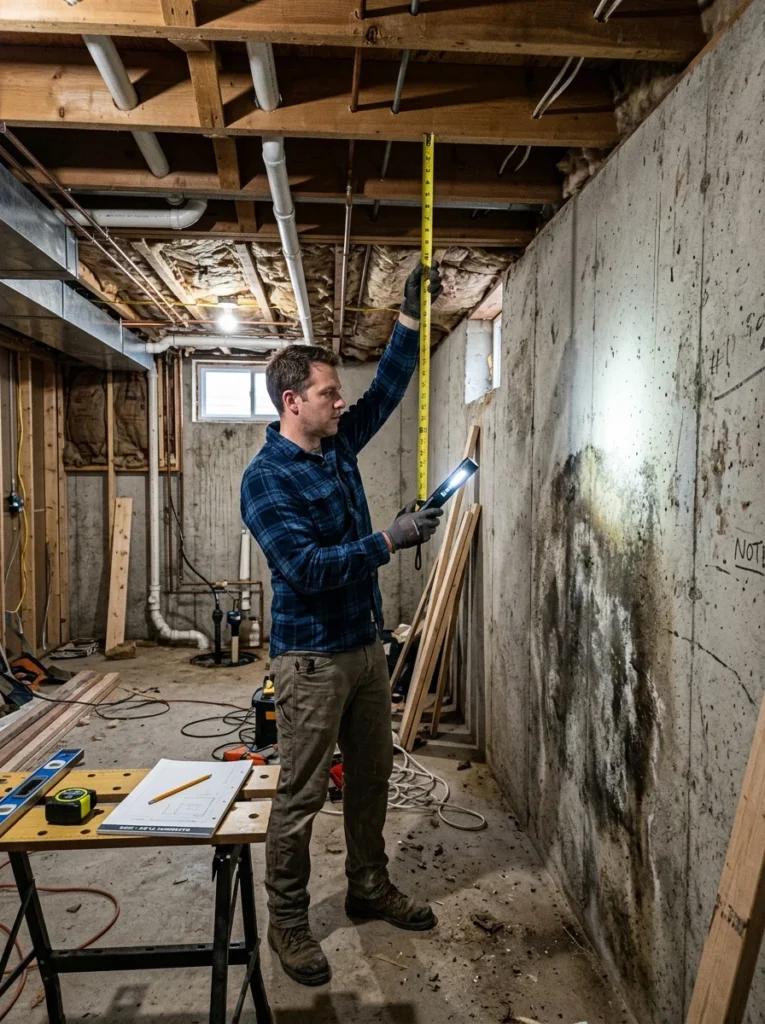
Assessing the moisture condition of an existing basement involves both visual inspection and instrumental measurement over a period of time — a single visual inspection on a dry day does not reveal the moisture conditions that occur during rain, during seasonal groundwater level changes, or during periods of high outdoor humidity.
The visual signs of moisture problems in an unfinished basement include efflorescence — the white, chalky mineral deposits left on concrete walls and floors when water carrying dissolved minerals evaporates after passing through the concrete. Efflorescence indicates that water is moving through the concrete and is a clear indicator of moisture infiltration that must be addressed before finishing. Water stains on the walls or floor — particularly at the base of the walls where the floor meets the foundation — indicate that liquid water has been present at that location. Rust stains on metal fasteners, anchors, or pipes indicate ongoing moisture exposure. A musty odor in the basement is a reliable indicator of mold growth, even when the mold itself is not visible.
A simple plastic sheet test provides evidence of whether moisture is entering the basement through the concrete itself or through condensation from the interior air. Tape a square of plastic sheet — approximately 12 by 12 inches — flat against the concrete floor and another against the concrete wall, sealing all edges with tape. Leave both sheets in place for 24 to 48 hours. If moisture accumulates on the concrete side of the plastic — between the plastic and the concrete — moisture is entering from outside through the concrete. If moisture accumulates on the room side of the plastic — on the surface of the plastic facing into the basement — the moisture is coming from condensation of the basement’s interior air. The two sources require different solutions, and distinguishing between them is important for choosing the correct remediation approach.
Ceiling Height — The Measurement That Determines Habitability
The ceiling height of the basement — the clear vertical distance from the concrete floor to the lowest obstruction, whether that is the underside of the floor joists, a beam, a duct, or a pipe — determines whether the finished basement will feel like a comfortable living space or a cramped, low-ceilinged room that discourages use.
The minimum ceiling height for a habitable basement space is typically established by local building codes and varies by jurisdiction, but is commonly set at seven feet of clear height throughout the majority of the finished space. A basement with a floor-to-joist-bottom height of eight feet or more — before any ceiling finish is installed — provides comfortable headroom after a finished ceiling is added, since most ceiling finish systems add two to four inches of thickness to the overhead structure. A basement with a floor-to-joist height of exactly seven feet has limited tolerance for any ceiling finish that adds thickness below the joists.
Basements with ceiling heights below seven feet — a common situation in older homes — present a genuine habitability challenge that cannot be resolved by the finishing choices alone. In these situations, the options include excavating the floor to increase the floor-to-joist height — a significant and expensive undertaking that involves digging out and lowering the concrete floor slab while maintaining the foundation structure — or accepting that the basement space is not suitable for primary habitable use and planning instead for lower-occupancy uses such as storage, mechanical space, or activities that do not require extended standing occupancy.
In a basement with variable ceiling height — where the main open areas have adequate height but beams, ducts, and pipes reduce the height in specific locations — the finishing plan can work around these obstructions by treating them as design constraints that define the pathway and layout of the finished space rather than as problems to be eliminated.
Load-Bearing Walls — What You Can and Cannot Change
An unfinished basement often contains support columns, steel beams, or concrete block walls that are structural — they carry the load of the floors and walls above. These structural elements cannot be removed without engineering analysis and, in most cases, without replacement by an engineered alternative load-carrying system. Misidentifying a structural element as a non-structural partition and removing it is one of the most serious and most expensive mistakes in basement renovation.
Before finalizing any basement finishing plan that involves removing or relocating walls, columns, or other elements, the structural role of each element needs to be confirmed by a qualified structural engineer or building professional. In most jurisdictions, any structural modification to a basement requires a building permit and engineer-certified drawings — the permit process itself serves as a check on the structural assessment.
Non-structural elements — partition walls that divide the basement space without carrying structural loads from above — can be removed or relocated without structural engineering analysis, though a building permit may still be required depending on the scope of the work and the local building code.
Egress — The Legal Requirement for Basement Bedrooms
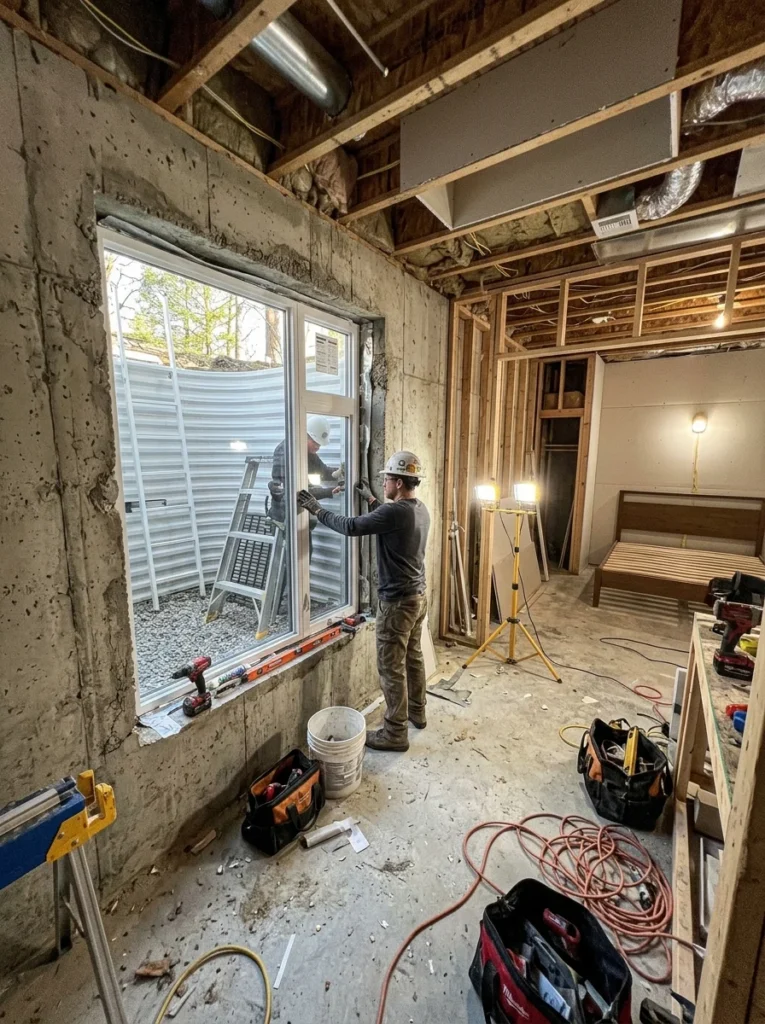
If the finishing plan includes a bedroom in the basement — a room that will be used for sleeping — the room must have an egress window: a window of sufficient size and appropriate placement to serve as an emergency exit in the event that the primary exit (the stairway) is blocked by fire or other emergency.
The specific requirements for egress windows are established by local building codes and vary by jurisdiction, but common requirements include a minimum net clear opening area — typically 5.7 square feet — a minimum net clear opening height of 24 inches, a minimum net clear opening width of 20 inches, and a maximum sill height of 44 inches from the finished floor. The window must be openable from the inside without special knowledge or tools.
In basements where the existing windows do not meet egress requirements, adding an egress window requires cutting through the foundation wall — a significant structural modification that requires professional execution and building permit approval. In basements where no window openings currently exist, installing an egress window requires foundation wall cutting and the installation of a window well — an excavated area outside the foundation that allows the window to be positioned below grade while maintaining the required opening size.
A basement bedroom without a compliant egress window is a code violation, a safety hazard, and a liability issue that affects the home’s insurability and resale value. The egress window requirement is non-negotiable for any space designated as a bedroom.
Section 2: Moisture and Waterproofing — Solving the Problem Before It Is Hidden
Once the moisture assessment has identified the presence and source of moisture infiltration, the appropriate remediation must be completed before any finishing work begins. Installing insulation, framing, drywall, and flooring over an unresolved moisture problem produces a finished space that looks correct initially and then fails progressively as moisture compromises the materials installed over it.
Interior Waterproofing Solutions
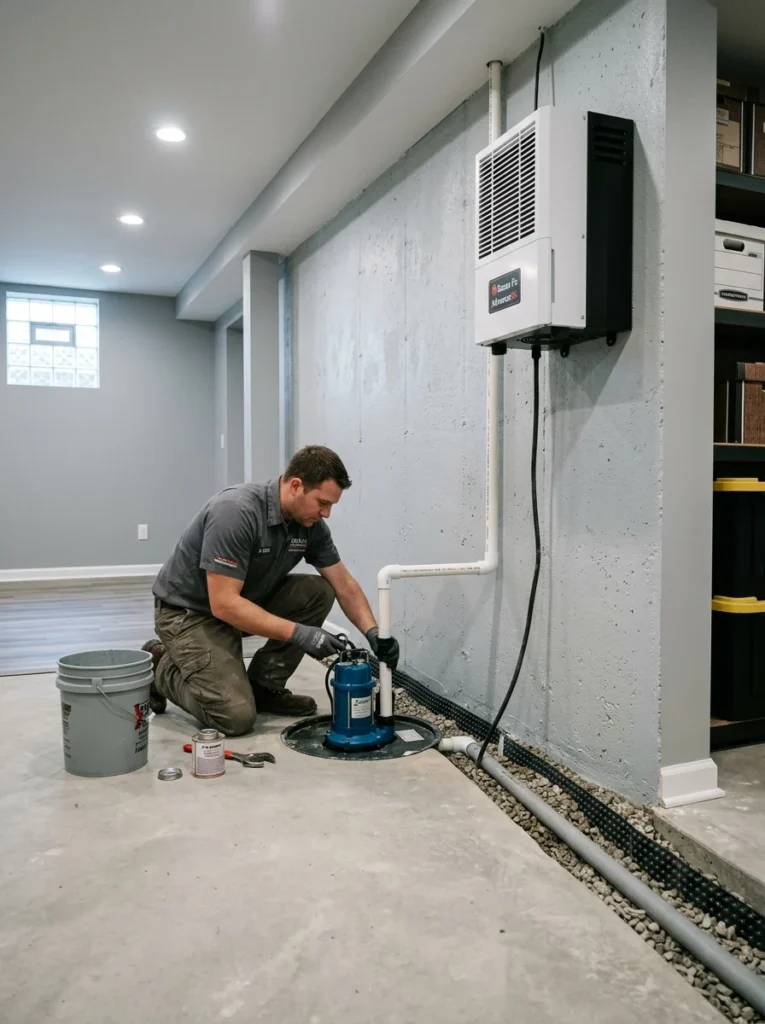
Interior waterproofing addresses moisture that is already entering the basement from outside rather than preventing it from entering at the source. The most common and most widely used interior waterproofing system is an interior drainage system — a perforated drain channel installed at the perimeter of the basement floor, just inside the foundation walls, that collects water infiltrating through the walls or through the wall-floor joint and channels it to a sump pump that discharges it outside the home.
This interior drainage approach does not prevent water from entering the basement through the foundation walls — it manages the water after it enters, directing it to a controlled discharge point rather than allowing it to spread across the basement floor. For basements with chronic moisture infiltration, this system — properly installed by a qualified waterproofing contractor — is the most reliable and most widely recommended solution.
A sump pump is typically a component of the interior drainage system. The sump pump is installed in a pit — the sump basin — at the lowest point of the basement floor. Water collected by the interior drainage channel flows to the sump basin, where the pump activates automatically when the water level reaches a set point and discharges the water through a pipe to the exterior of the home. A battery backup sump pump — a secondary pump that activates if the primary pump fails or if a power outage occurs during a water infiltration event — is a strongly recommended addition to any basement finishing project where the basement has a history of moisture infiltration.
Dehumidification — Essential for Basement Comfort and Durability
Even basements without active water infiltration typically have higher relative humidity than the floors above, because concrete absorbs and releases moisture from the soil around the foundation throughout the year. A finished basement without a dehumidification system will accumulate moisture in the air that condenses on surfaces, promotes mold growth, and creates the musty atmosphere that is the most common complaint about finished basements.
A dedicated basement dehumidifier — sized for the square footage of the finished basement space — is essential for maintaining comfortable and healthy air quality in the finished space. Basement dehumidifiers are available in several capacities, measured in pints of moisture removed per day, with appropriate sizes for basement spaces ranging from small — 30 pints per day for a basement of 500 square feet or less with moderate humidity — to large — 70 pints per day for larger basements or those with significant moisture challenges.
The dehumidifier should be positioned to allow adequate air circulation around it and connected to a drain — either a floor drain in the basement or a drain hose that runs to a utility sink or to the exterior — so that it drains continuously rather than requiring manual emptying of a collection reservoir. A dehumidifier that requires manual emptying in a finished basement will frequently go unemptied, which defeats its purpose.
Section 3: Ceiling Options — Choosing the Right Overhead Finish
The ceiling of the finished basement is one of the most consequential finishing choices because it affects the room’s apparent height, its aesthetic quality, its acoustic character, and its ability to provide access to the mechanical systems — plumbing, electrical, HVAC ducts — that typically run through the ceiling space.
Drop Ceiling — The Most Accessible Option
A drop ceiling — also called a suspended ceiling — consists of a metal grid system hung from the structural ceiling by wires, into which ceiling tiles are placed. The grid hangs below the joists and pipes, creating a new, lower ceiling surface. Individual tiles can be removed from the grid to access the plumbing, electrical, and HVAC components above the ceiling without any destructive work.
The primary practical advantage of a drop ceiling for a basement is the accessibility it provides to the mechanical systems that run through the ceiling space. In any basement, there will be periodic need to access the plumbing, the electrical wiring, the HVAC ducts, and other systems that are routed through or along the ceiling. A drywall ceiling makes this access possible only through destructive work — cutting through the drywall, making the repair, and patching and repainting the damaged area. A drop ceiling makes the same access a matter of removing and replacing the relevant tile with no destructive work and no finishing repair.
The primary aesthetic limitation of the standard drop ceiling is its appearance — the grid pattern of a standard acoustic tile drop ceiling has a commercial, institutional quality that suits offices and commercial spaces but feels visually uninspiring in a residential living space. This limitation is addressed by several options within the drop ceiling category. Specialty drop ceiling tiles in wood-look finishes, tin-look finishes, and other decorative formats replace the standard acoustic tile while maintaining the accessibility of the drop ceiling system. Planked drop ceiling systems — systems with narrow planks rather than tiles — create a more residential, more contemporary aesthetic.
The height penalty of a drop ceiling — the reduction in clear ceiling height caused by the depth of the grid system and the tile — is typically three to six inches. In basements with generous ceiling heights, this reduction is acceptable. In basements with ceiling heights near the minimum, the three-to-six-inch reduction may bring the finished ceiling below the comfortable habitation threshold.
Drywall Ceiling — The Most Polished Finish
A drywall ceiling — sheets of gypsum board screwed to furring strips or directly to the underside of the floor joists — creates the smoothest, most residential, most polished ceiling surface of any basement ceiling option. When finished with joint compound, primed, and painted, a drywall ceiling in a basement is visually indistinguishable from the ceilings of the floors above, which creates the most seamless integration of the basement space into the home’s overall aesthetic.
The primary limitation of the drywall ceiling is the permanent enclosure of the mechanical systems above it. Any access to plumbing, electrical, or HVAC above a drywall ceiling requires cutting through the ceiling, making the repair or adjustment, and patching, finishing, and painting the damaged area. In a basement that has been freshly finished, this represents a significant disruption and additional cost for what might otherwise be a straightforward maintenance task.
The practical approach to managing this limitation is to identify, before installing the drywall ceiling, which mechanical components are most likely to require future access — the main shutoff valves for the plumbing system, the electrical panel, the HVAC system components — and to install access panels at those locations rather than covering them with drywall. An access panel is a hinged door fitted into the drywall ceiling or wall that allows the mechanical component behind it to be reached without destructive work.
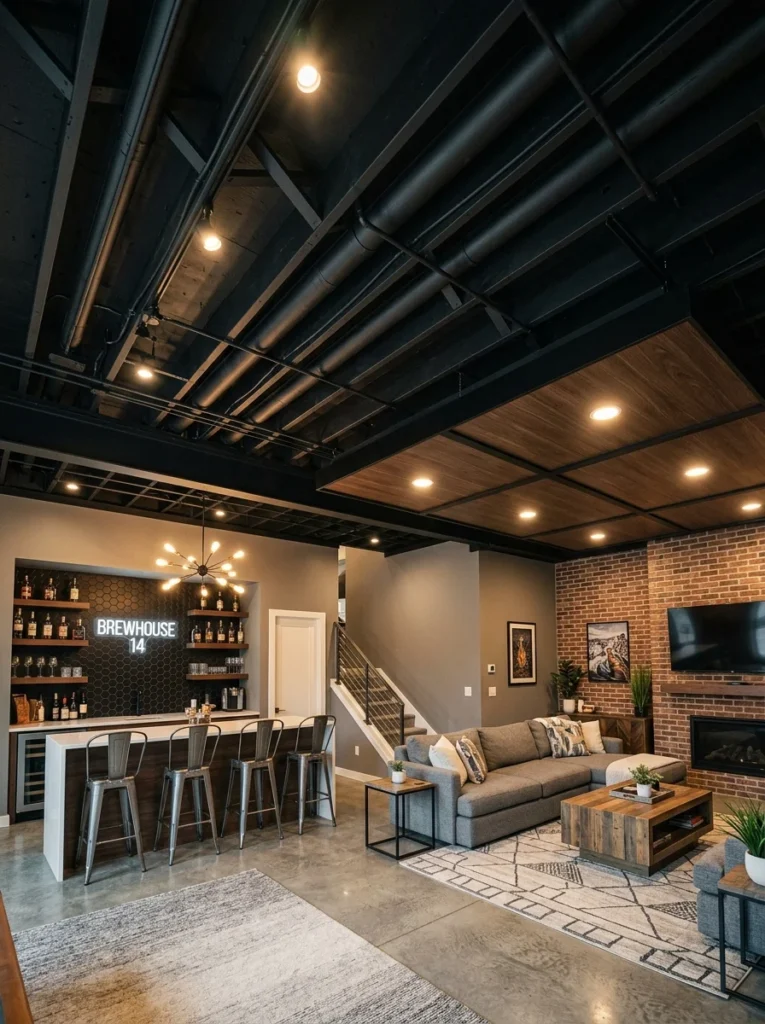
Exposed and Painted Ceiling — The Industrial Option
Leaving the ceiling structure exposed — joists, subfloor above, pipes, ducts, and all — and painting all of these elements in a single color creates the industrial, loft-style aesthetic that has become increasingly popular in contemporary residential design. An exposed painted ceiling in black or very dark grey — the most common choice for this approach — recedes visually, drawing less attention to the overhead structure and creating the impression of a slightly higher ceiling than the actual dimension.
The primary advantages of an exposed painted ceiling are cost — it eliminates the materials and labor of any ceiling finish system — and access — every mechanical component remains completely accessible without any demolition. The aesthetic result, when the industrial look suits the intended use of the basement space, can be genuinely impressive.
The painted ceiling approach requires thorough surface preparation — removing any loose or peeling paint from the existing concrete or wood surfaces, cleaning all surfaces of dust, grease, and debris — and the application of a paint that adheres to the multiple surface types present in the ceiling structure: wood joists, metal pipes, flexible ducts, and concrete. A high-quality latex paint with a satin or matte finish in the chosen color, applied with a sprayer for the most even coverage of the complex geometry, produces the best result.
Section 4: Framing and Insulation — Creating Interior Walls and Thermal Comfort
Wall Framing — Creating the Interior Surface
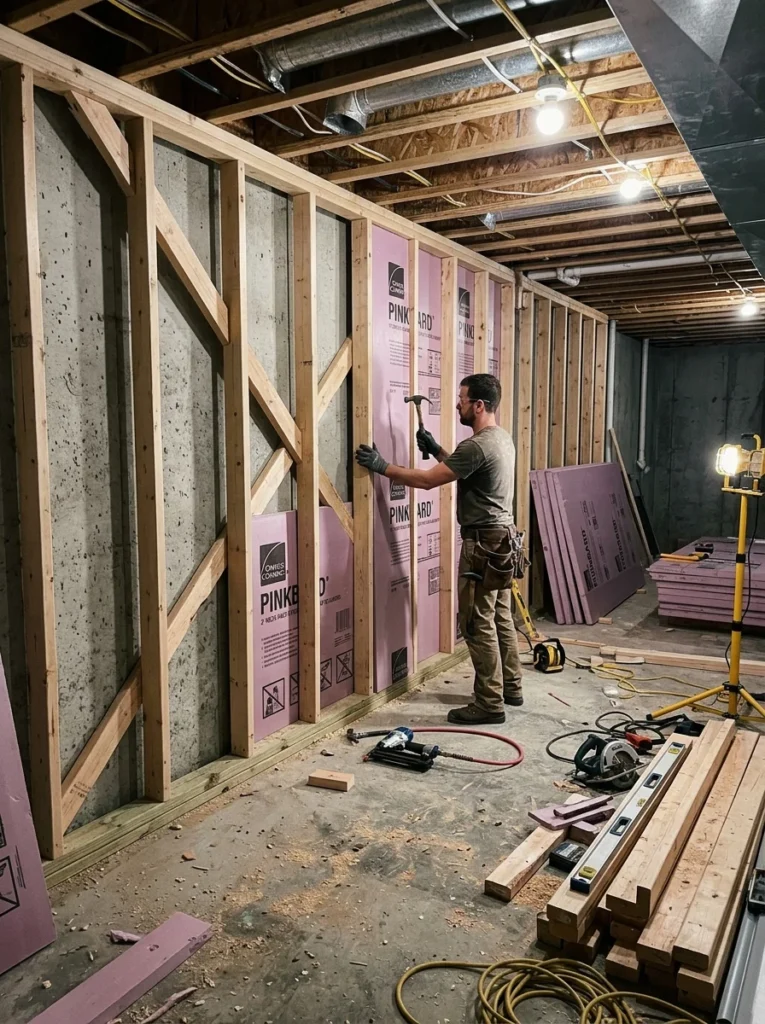
The exterior walls of the basement — the concrete or concrete block foundation walls — are not appropriate as finished interior wall surfaces. Concrete and concrete block walls are cold, irregular, absorptive of moisture, and incapable of receiving standard interior finishes directly. Interior walls need to be framed in front of the foundation walls to create a surface that can be insulated, that accepts drywall, and that provides a thermal break between the cold exterior foundation and the interior living space.
The standard approach is to frame a wood stud wall — typically 2×4 studs at 16-inch centers — parallel to the foundation wall and approximately one inch away from it. The one-inch gap between the stud wall and the foundation wall allows for minor foundation irregularities, prevents the wood framing from being in direct contact with the concrete where moisture could wick from the concrete into the wood, and provides a drainage path for any moisture that does infiltrate between the foundation and the framing.
Before framing interior walls, confirm the position of any anchor bolts, tie-downs, or structural connections that protrude from the foundation wall — these elements may need to be accommodated in the framing layout and should not be covered without documentation of their location.
Insulation — Types and Recommendations for Basement Walls
The choice of insulation material for basement walls is one of the most important technical decisions in basement finishing, because the basement wall insulation performs a function that is meaningfully different from above-grade wall insulation. Above-grade walls are surrounded by outdoor air, which changes temperature and humidity but rarely carries liquid water to the wall surface. Basement walls are surrounded by soil, which is persistently moist — the insulation chosen for basement walls must be able to perform its thermal function while being exposed to higher moisture levels than above-grade insulation.
Closed-cell spray polyurethane foam — sprayed directly onto the interior face of the foundation wall — is the highest-performance insulation option for basement walls and the one most recommended by building scientists who specialize in below-grade construction. Closed-cell spray foam is a vapor retarder — it resists the passage of moisture vapor through it — while also providing excellent thermal performance per inch of thickness. Its ability to fill irregularities in the foundation wall surface creates a complete coverage without gaps, which are a significant source of thermal bridging in other insulation formats.
Rigid foam board insulation — panels of expanded polystyrene, extruded polystyrene, or polyisocyanurate rigid foam — installed against the foundation wall behind the stud framing is a more affordable alternative to spray foam that also provides adequate moisture resistance for basement wall applications. Rigid foam board should be cut to fit snugly between framing elements and mechanically fastened or adhesively bonded to the foundation wall. Joints between panels should be taped to prevent air and moisture migration through the gaps.
Fiberglass batt insulation — the most widely used and most affordable insulation material in above-grade residential construction — is the least appropriate insulation for basement walls because of its behavior in high-moisture environments. Fiberglass batts do not resist moisture vapor movement, they absorb and hold liquid water, and they provide an excellent growing medium for mold when persistently moist. Fiberglass batts installed in basement stud walls frequently become moldy within one to three years in any basement with residual moisture challenges — a situation that requires demolishing the interior walls to remediate.
Section 5: Flooring — What Works Over Concrete
The concrete floor slab of an unfinished basement is cold, hard, and typically damp enough that many flooring materials used on above-grade floors are inappropriate or unreliable when installed directly over it.
Luxury Vinyl Plank — The Most Practical Basement Flooring
Luxury vinyl plank flooring — thick, rigid vinyl planks with a realistic wood grain or stone appearance — is the most widely recommended and most practically appropriate flooring for finished basements, and for good reason. Luxury vinyl plank is fully waterproof — not water resistant, but genuinely waterproof — which means that moisture vapor rising through the concrete slab, condensation on the slab surface, and any water that finds its way onto the floor does not damage the flooring. It is dimensionally stable — it does not expand and contract with moisture changes the way wood-based flooring does. It is comfortable underfoot relative to bare concrete, particularly with an appropriate underlayment. And it is available in a wide range of realistic wood and stone appearances that suit any finished basement aesthetic.
The installation of luxury vinyl plank over a concrete slab requires a flat, clean, and level slab surface. Concrete slabs are rarely perfectly flat, and high spots and low spots in the slab need to be addressed before installation — high spots are ground down and low spots are filled with a self-leveling compound — to prevent the rigid vinyl planks from cracking or developing a hollow sound when walked on.
Engineered Wood — A Warmer Alternative With Conditions
Engineered wood flooring — a thin veneer of real wood bonded over a plywood or wood fiber core — has better moisture resistance than solid hardwood but is not fully waterproof and is not appropriate for use in basements with active moisture problems or persistent high humidity without appropriate moisture management.
In a basement where the moisture assessment has confirmed that moisture is well controlled — no active infiltration, a dehumidification system maintaining appropriate relative humidity — engineered wood provides a warmer, more premium appearance than luxury vinyl plank at the cost of greater moisture sensitivity. Engineered wood in a basement should always be installed with a vapor barrier between the concrete slab and the flooring to reduce the moisture vapor exposure of the wood from below.
Tile — Practical But Cold
Ceramic and porcelain tile is fully waterproof and dimensionally stable, which makes it appropriate for basement floors from a moisture perspective. Its limitation is comfort — tile is hard underfoot, transmits the coldness of the concrete slab below it, and is acoustically live in a way that can make a basement family room feel less comfortable than one with a softer, warmer flooring material.
Tile is most appropriate for basement areas used primarily for utility rather than comfort — basement laundry rooms, basement bathrooms, and similar utility areas where the waterproof performance of tile is more valuable than the comfort of a warmer flooring material.
Radiant floor heating — electric heating elements installed between the concrete slab and the tile — addresses the coldness limitation of tile in a basement and makes a tile-floored basement space genuinely comfortable underfoot. The installation of electric radiant floor heating during the basement finishing — before the flooring is installed — is a relatively modest addition to the project cost that produces a daily quality-of-life improvement that basement users consistently report as one of the most valued features of the finished space.
Avoid: Hardwood Directly on Concrete
Solid hardwood flooring should not be installed directly over concrete in a basement. Concrete slabs contain and emit significant moisture vapor even when they appear dry, and the moisture vapor exposure causes solid hardwood flooring to expand, cup, buckle, and eventually delaminate. Even with a vapor barrier, the moisture environment of a basement is sufficiently different from the above-grade environment for which solid hardwood is designed that its long-term performance in a basement is unreliable.
Section 6: Lighting — Compensating for the Absence of Natural Light
A basement without windows — or with windows too small or too high in the wall to provide meaningful natural light — requires a lighting plan that compensates for the complete absence of natural illumination. A basement that is fully dependent on artificial light needs significantly more artificial light sources than a room with natural light, and the quality and warmth of those artificial sources matters more in a space where there is no natural light to define the room’s character.
Recessed Lighting — The Most Appropriate Primary Light for Basements
Recessed ceiling lights — fixtures installed flush with the ceiling surface so that only the trim ring is visible — are the most appropriate primary light format for finished basements for several reasons. They do not reduce the ceiling height by hanging below the ceiling surface, which is particularly important in basements where every inch of height matters. They provide even, downward illumination across the floor area. They are relatively straightforward to install during the basement finishing project when the ceiling is open. And they are available in a range of color temperatures that allow the lighting to be specified for the warmth and character appropriate to the intended use of the space.
The number and placement of recessed lights should be planned to provide even illumination across the full floor area without dark corners or bright spots. A general rule for recessed light spacing is to divide the ceiling height by two to get the approximate spacing between fixtures — a basement with an eight-foot ceiling height spaces recessed lights approximately four feet apart in each direction. At a typical fixture output of 650 lumens per fixture, this spacing provides adequate general illumination for a residential living space.
Warm white bulbs — 2700 to 3000 Kelvin color temperature — are the appropriate specification for a basement living space where the goal is a warm, welcoming atmosphere. Cool white or daylight bulbs in a basement without natural light create a harsh, institutional illumination quality that is inappropriate for a residential living environment.
Supplemental Lighting for Atmosphere
Beyond the recessed ceiling lights that provide general illumination, a finished basement benefits from supplemental lighting at lower levels — floor lamps, table lamps, and wall sconces — that add the layered illumination quality that makes a space feel warm and inviting rather than flatly, uniformly lit. A basement family room with recessed ceiling lights supplemented by a floor lamp in one corner, a table lamp beside the sofa, and a wall sconce or two on the walls has a warmth and depth of illumination that the same room with only ceiling lights cannot achieve.
Section 7: Popular Basement Uses — Choosing the Right Purpose for Your Space
The finished basement can serve any of several primary uses, and the choice of primary use should be made before the finishing plan is finalized — because the use determines important aspects of the finishing specification.
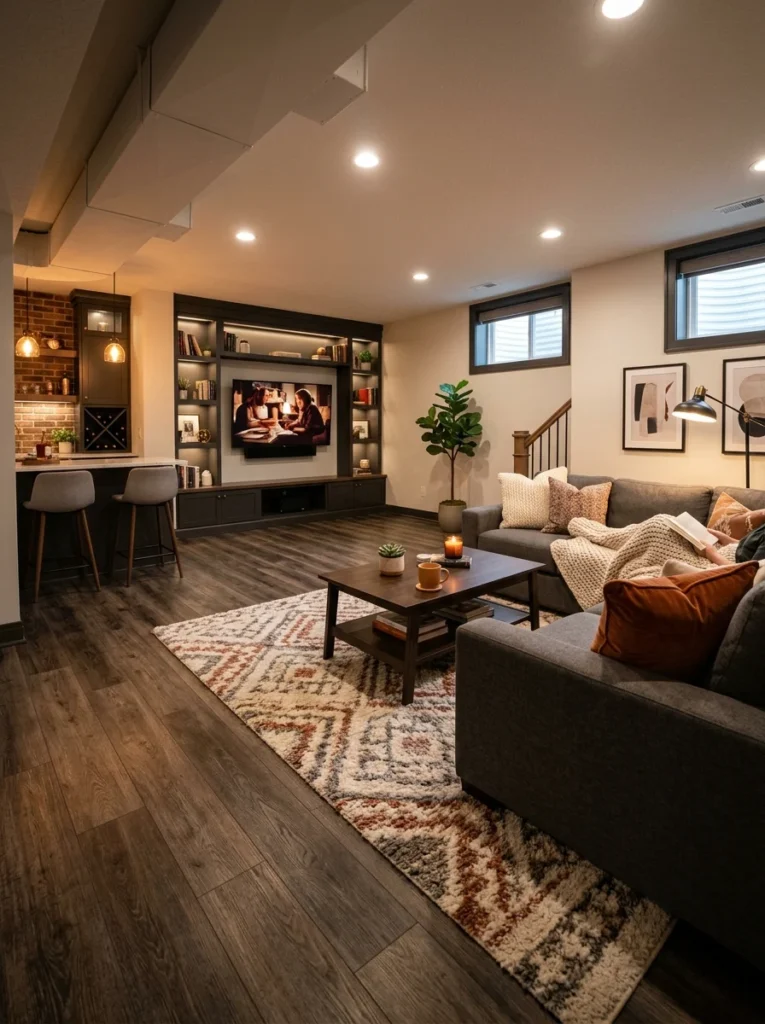
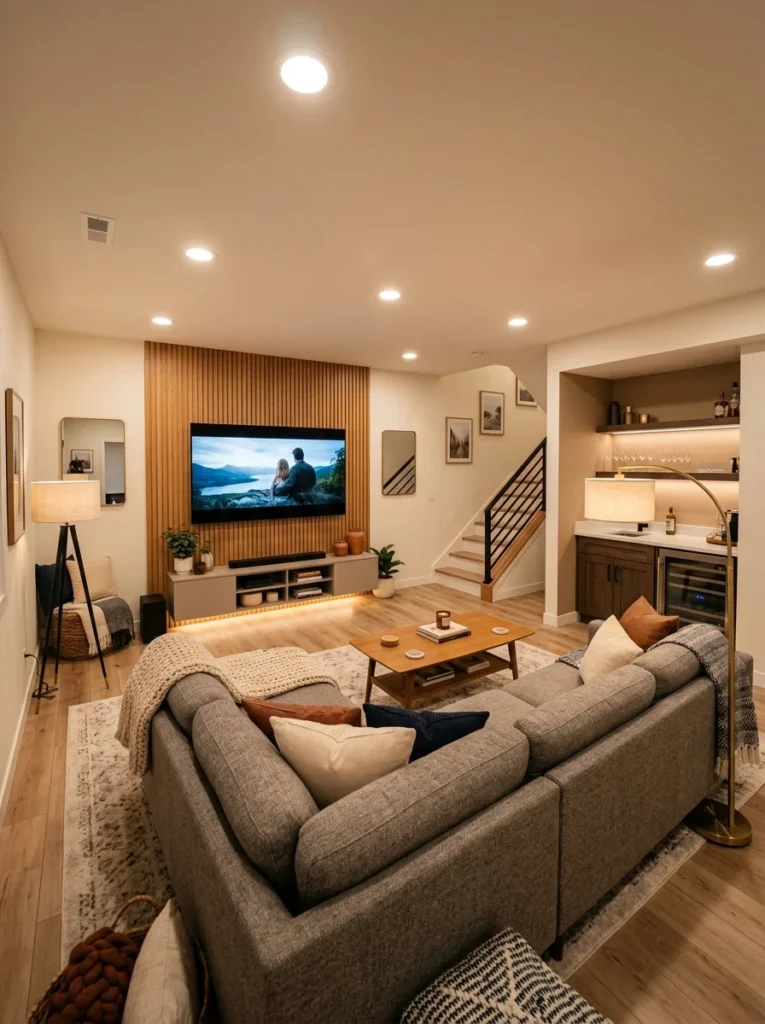
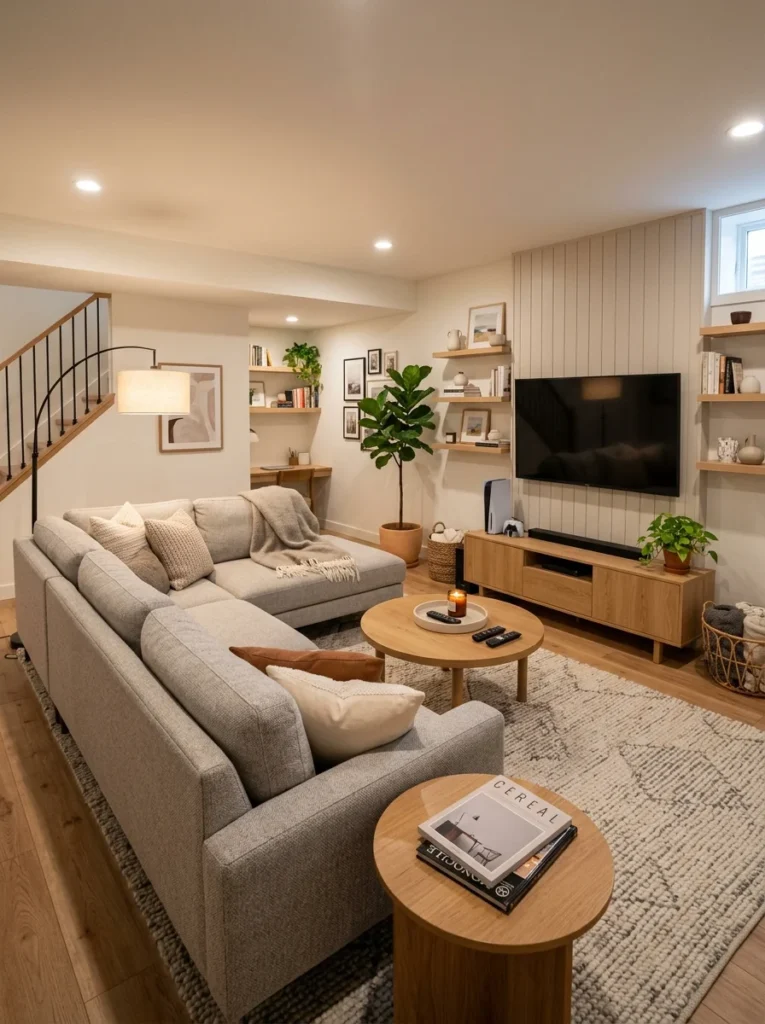
Family Room and Entertainment Space
The family room or entertainment basement is the most common primary use for a finished basement, and it suits the basement’s characteristics well — the below-grade position naturally reduces noise transmission to and from the main living floors, the absence of windows reduces glare on screens, and the separation from the primary living areas of the house creates a dedicated entertainment zone that does not compete with other household activities.
The finishing specification for a basement family room prioritizes comfortable flooring — luxury vinyl plank or engineered wood — adequate lighting with good dimmer control, acoustic treatment to manage the sound reflectivity of the concrete and drywall surfaces, and HVAC provision for year-round comfort.
Home Office

A basement home office benefits from the natural quiet of the below-grade position and the separation from the main household activity. The finishing requirements include adequate lighting — a particular challenge in a windowless basement office where the absence of natural light requires careful artificial lighting planning — adequate electrical provision for office equipment, data and communication connections, and climate control that maintains comfortable working conditions year-round.
Basement Bedroom
A basement bedroom requires the egress window discussed in the assessment section — a non-negotiable safety requirement — along with the full habitability provisions: adequate ceiling height, adequate natural light through the egress window, complete thermal and acoustic separation from the mechanical systems, and appropriate ventilation. A basement bedroom is the most regulated use of a basement space from a building code perspective and requires building permit approval and inspection in virtually all jurisdictions.
Children’s Playroom
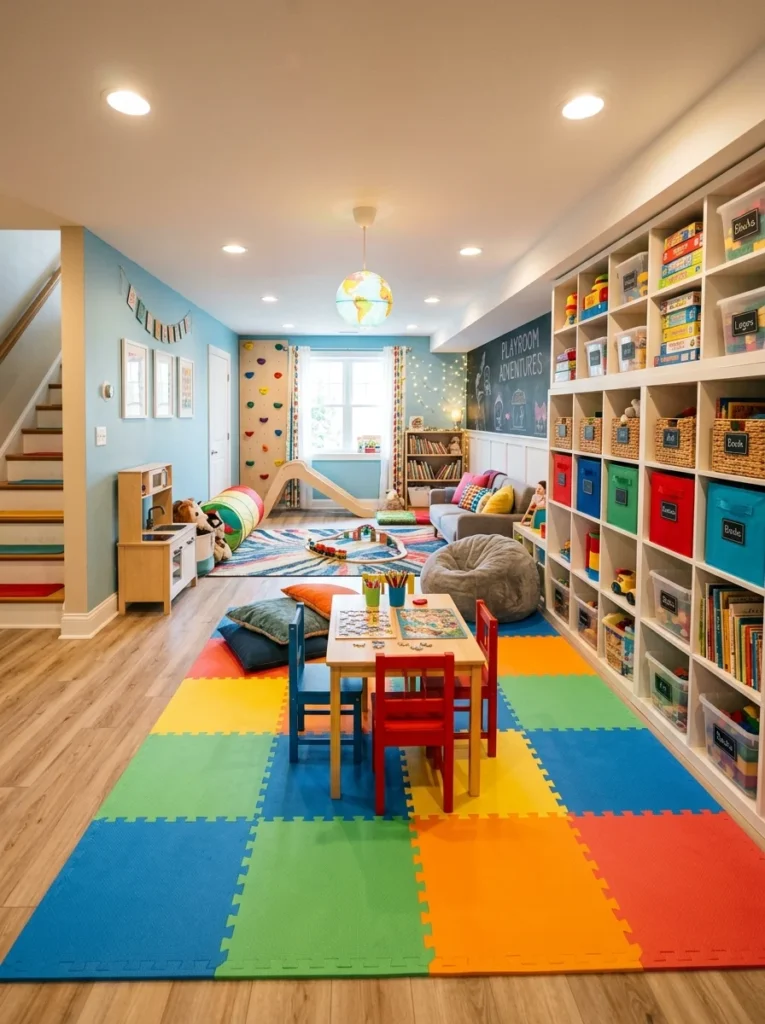
A basement children’s playroom suits the below-grade position particularly well — the containment of children’s activities and noise below the main living level reduces the impact on the rest of the household. The finishing requirements prioritize durable, easy-to-clean flooring — luxury vinyl plank handles the demands of children’s play well — adequate lighting, and the complete elimination of any safety hazards such as exposed electrical, accessible mechanical equipment, and low-clearance protrusions.
Home Gym
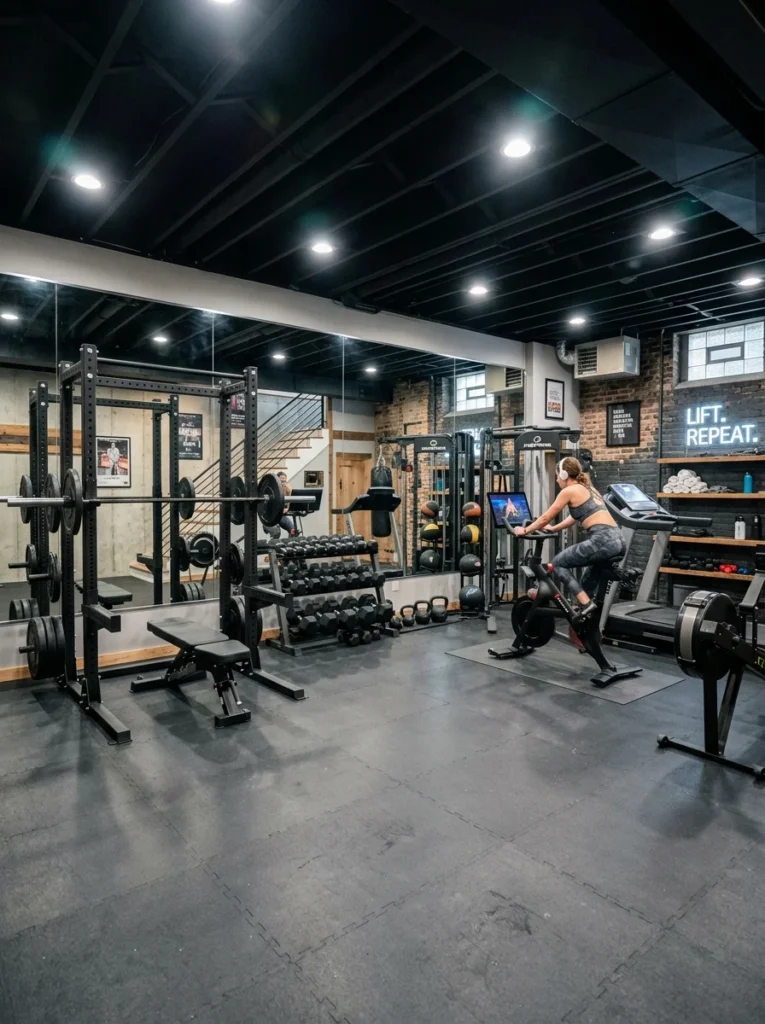
A basement home gym is one of the most practical uses of basement space because it suits the basement’s concrete floor — which can support heavy equipment loads without concern — and because the noise and impact of exercise equipment is contained below the main living level rather than transmitted through the floor to the rooms above. The finishing requirements for a home gym prioritize durable rubber flooring over the concrete slab, adequate ventilation, full-length mirrors on at least one wall, and adequate electrical provision for equipment.
Conclusion
Converting an unfinished basement into a livable space is one of the most impactful home improvement projects a homeowner can undertake — adding genuine living area, increasing the home’s functional capacity, and delivering value that extends well beyond the cost of the finishing project itself. The project’s success depends almost entirely on the quality and completeness of the assessment that precedes it — the thoroughness of the moisture evaluation, the clarity about structural constraints, the confirmation of egress requirements, and the honest evaluation of ceiling height — and on the quality of the moisture remediation that follows from that assessment.
A basement finished over an unresolved moisture problem fails. A basement finished correctly — with moisture addressed comprehensively, with appropriate insulation and vapor management, with appropriate flooring for the below-grade environment, with adequate lighting that compensates for the absence of natural light, and with a clear purpose that guided every finishing decision — is a space that adds genuine daily value to the household for as long as the home stands.
The process has its challenges — it involves building permit applications, structural assessments, mechanical system integration, and the management of multiple contractors working on different aspects of the project — but the outcome of navigating those challenges correctly is a room that the household uses and values every day. That outcome is worth the careful, methodical approach that good basement finishing requires.